Introduction:
To capture your visitors' attention, one of the top priorities is to create an engaging and memorable user experience. Eye-catching visual elements are a good way of achieving this.
One of these visual elements is the infinite scrolling (marquee) of logos, a good way of presenting a series of logos or even images moving in a loop.
In this article, we'll explore how to integrate this dynamic touch into your Webflow site, either through Webflow interactions, a few lines of custom code or a third, more advanced option, each with its advantages and disadvantages.
Come on, let's go!
What is an "infinite marquee" and why use it?
Infinite marquee is a continuous scrolling effect that allows elements such as logos or images to move horizontally in a loop. This effect adds dynamism to your site, instantly drawing visitors' eyes to the moving elements. It can be used in a variety of ways:
- Customer logos or testimonials: use infinite marquee to showcase your customers' logos or testimonials to reinforce your credibility.
- Recent projects: highlight your recent projects or important achievements by scrolling them in a loop to attract attention.
- Important messages: use infinite scrolling to share important announcements or promotional messages in a subtle but powerful way.
By adding infinite scrolling (infinite marquee) to your Webflow site, you can not only improve the visual appearance of your design, but also draw visitors' attention to specific elements you wish to highlight. In the next section, we'll explore the steps involved in preparing and creating this feature directly in Webflow.
How the infinite scroll animation works
Now, before delving into the details of implementation, let's take a look at how marquee animation (infinite scrolling) works.
Imagine two lists of identical logos, side by side, each taking up at least one screen width. In their initial state, one will be visible to the user, while the other will be hidden from view.
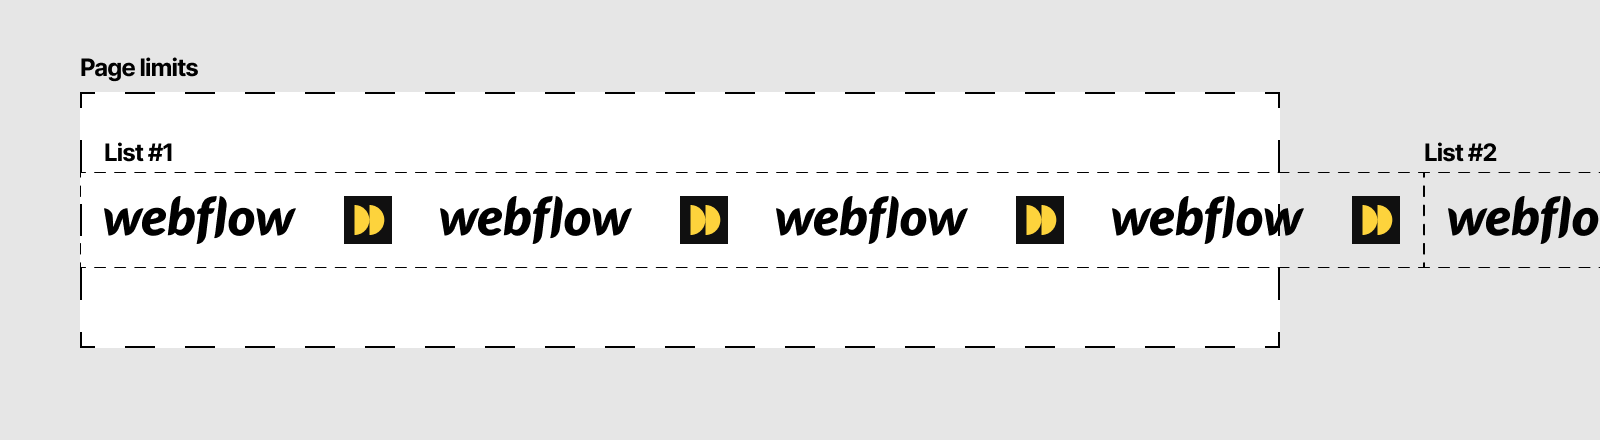
To create the illusion of scrolling, we'll move these two lists with a horizontal motion animation (CSS transform). When both lists have been moved 100% of their width to the left, the initially hidden list will have taken the place of the initially visible list.
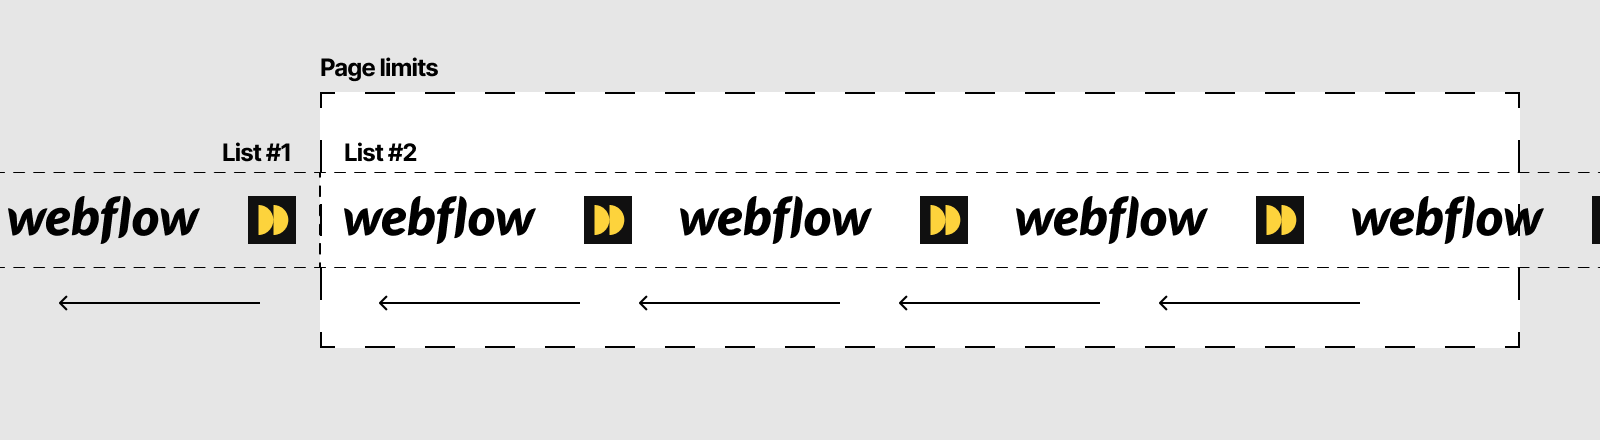
At this point, we'll immediately return the two lists to their starting positions and resume the animation from the beginning.
By repeating this animation in a loop, we then obtain an infinite scrolling effect, where the logos seem to slide endlessly from one side to the other. This trick gives the appearance of a continuous flow of logos, in reality using only two static lists.
In the next section, we'll dive into the preparations needed to set up this animation in Webflow.
Preparing for infinite scrolling in Webflow
To create your infinite logo scrolling animation, it's essential to be well prepared in Webflow. Follow these steps to ensure you get the result you want:
1. Group your assets :
Start by gathering the logos or elements you want to scroll. Make sure they're all of a similar size to ensure smooth, seamless scrolling.
2. Create your component :
In the section where you want to add your marquee, add a Div Block that will act as a container for the entire component. Give it a class, such as marquee_component.
3. Create the component structure:
In your component, create the following structure:
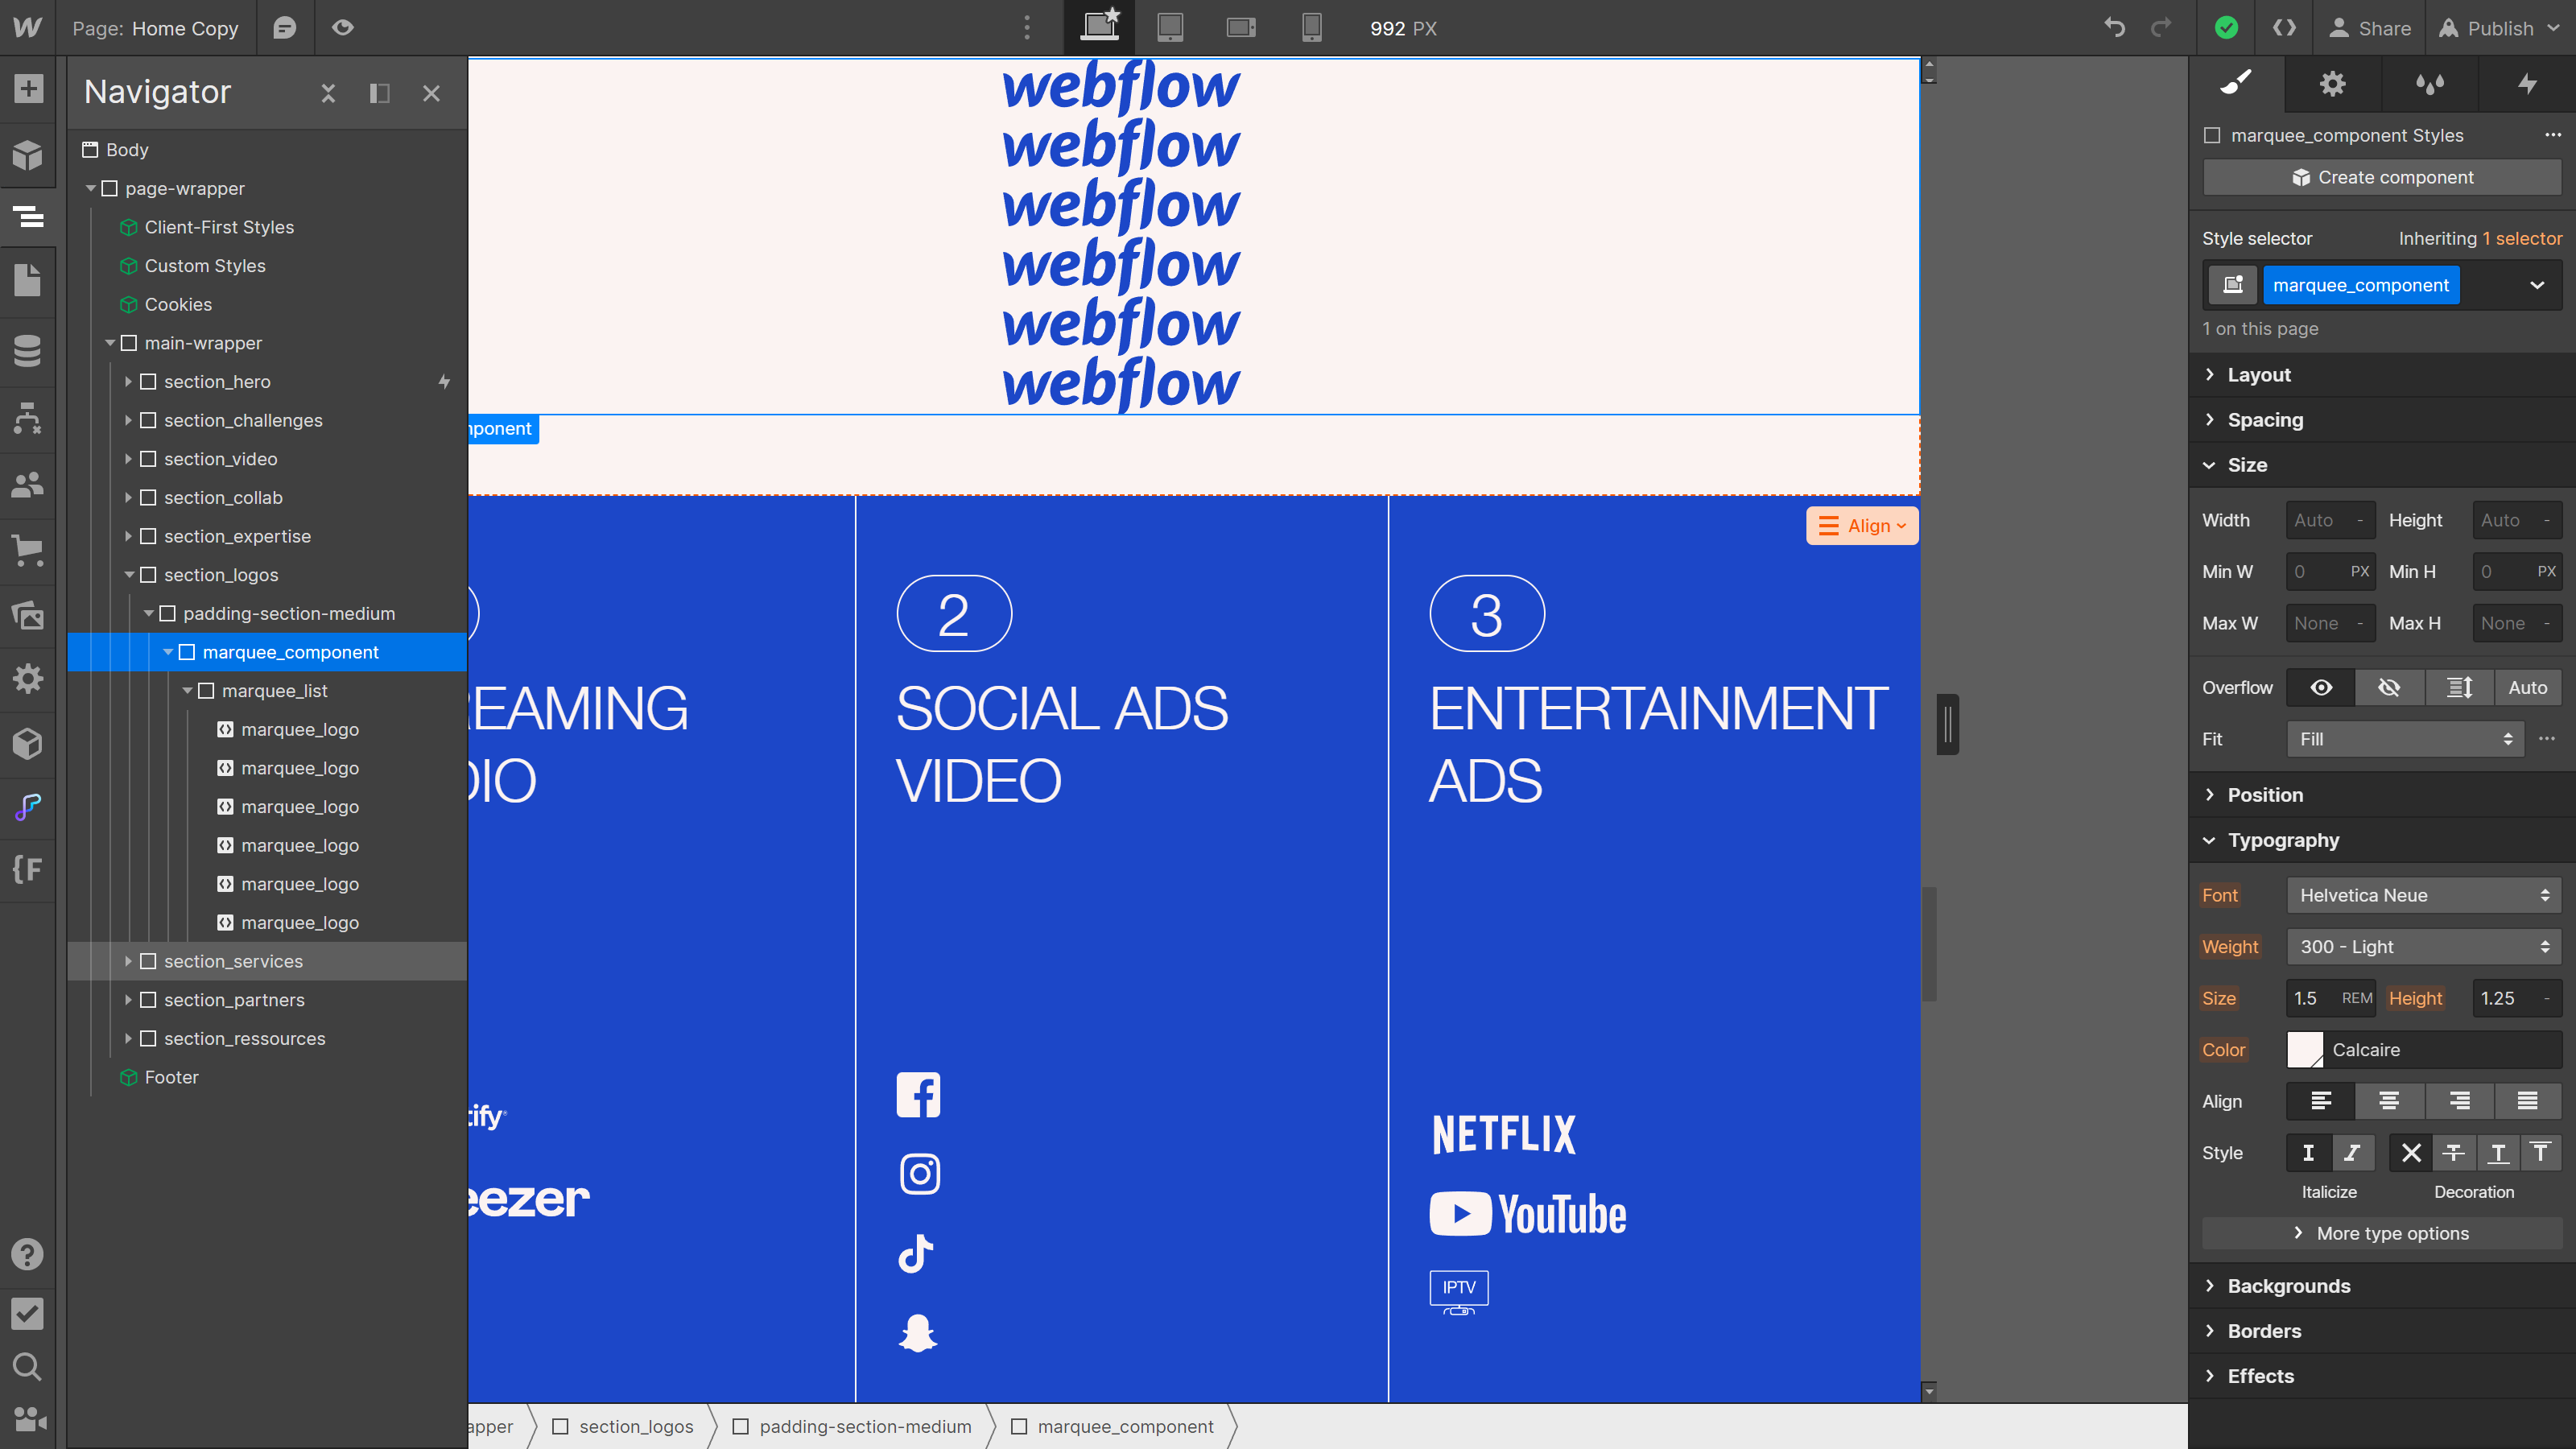
- Inside the component, add a Div Block that will contain the first collection and give it a class, e.g. marquee_list.
- Within this list, add your assets and give them a class, e.g. marquee_logo.
4. Create the styles needed for infinite scrolling
- To position the two lists next to each other, apply a horizontal Flexbox to your marquee_component element.
- To manage logo layout, apply a horizontal Flexbox to your marquee_list class.
- To manage logo spacing, add the desired gap (e.g. 4rem) to the Flexbox of the marquee_list class.
- To manage the spacing between the last logo of one list and the first logo of the next, add a padding-right to your marquee_list element, equivalent to the Flexbox gap.
- Finally, to prevent logos from being resized, set the Flex Child property of the marquee_list and marquee_logo elements to " Don't shrink or grow ".

Important: managing the spacing between lists with the Flexbox gap of the marquee_component creates an offset between the end and resumption of the animation loop: so use padding-right instead.
5. Duplicate the list:
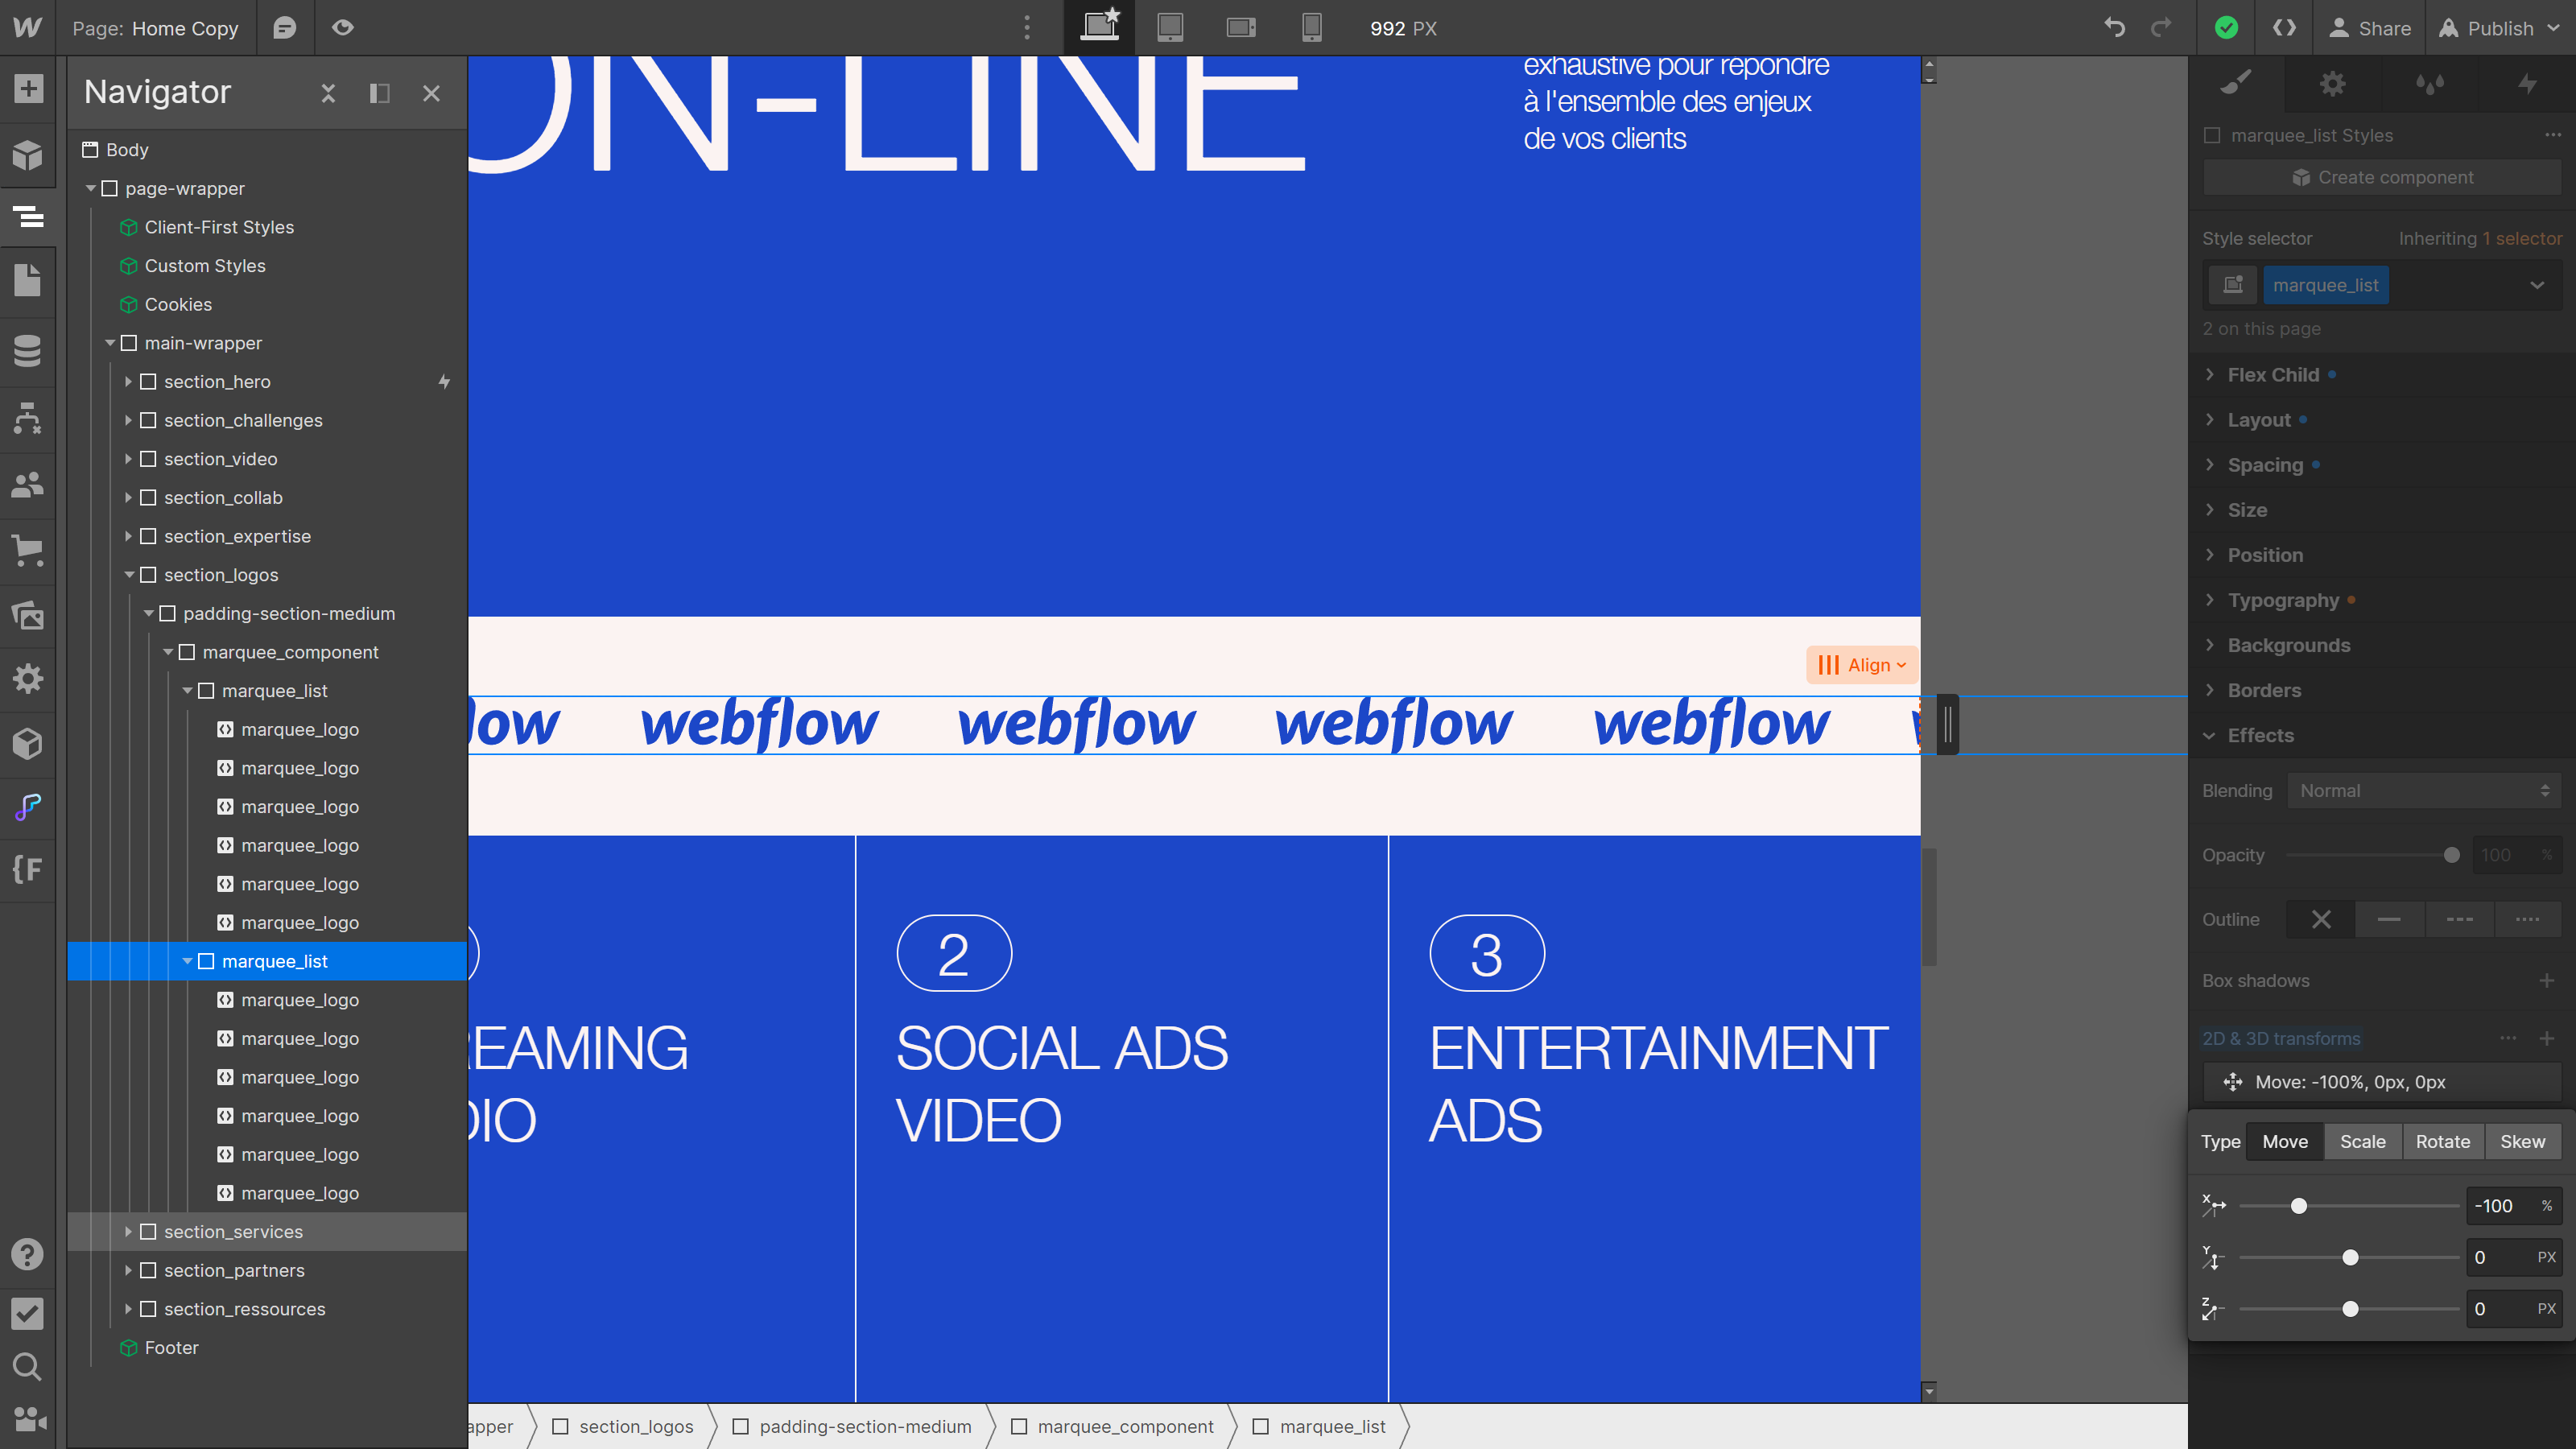
Once you've added your assets and styles, simply make a copy of marquee_list to enable the infinite scrolling animation to work.
For the animation to work well visually, make sure that the component in its final state always takes up at least one screen width. If it doesn't, duplicate it again.
To perform the test, apply a horizontal transformation effect of -100% to your marquee_list class to simulate the final state of the interaction. Don't forget to remove the CSS transformation effect after testing.
6 (Optional) Adapt the structure for a CMS collection:
If you wish to apply this effect to a CMS collection, here are the adjustments you need to make:
- Place the collection inside the marquee_component element.
- Give the marquee_list class to the Collection List element.
- Place your logos (marquee_logo) inside the Collection Item element.
- To prevent logos from being resized, set the Flex Child property of the Collection List Wrapper and Collection Item elements to "Don't shrink or grow".
- Rather than duplicating the marquee_list, this time duplicate the Collection List Wrapper element to adjust the component size.

Now that you've prepared the structure, you're ready to add the infinite scrolling interaction. In the next section, we'll go through the steps involved in creating this effect.
Infinite marquee animation creation
Now that your structure and logos are ready, it's time to add the interaction that will allow your logos to scroll indefinitely.
There are several approaches to achieving this effect: using Webflow's native interactions, creating an equivalent animation in CSS with custom code, or a third option for more advanced needs.
Option 1: Webflow's native interactions
Webflow offers a great way to create animations without any coding knowledge. Here's how you can implement the infinite scrolling effect using Webflow's native interactions:
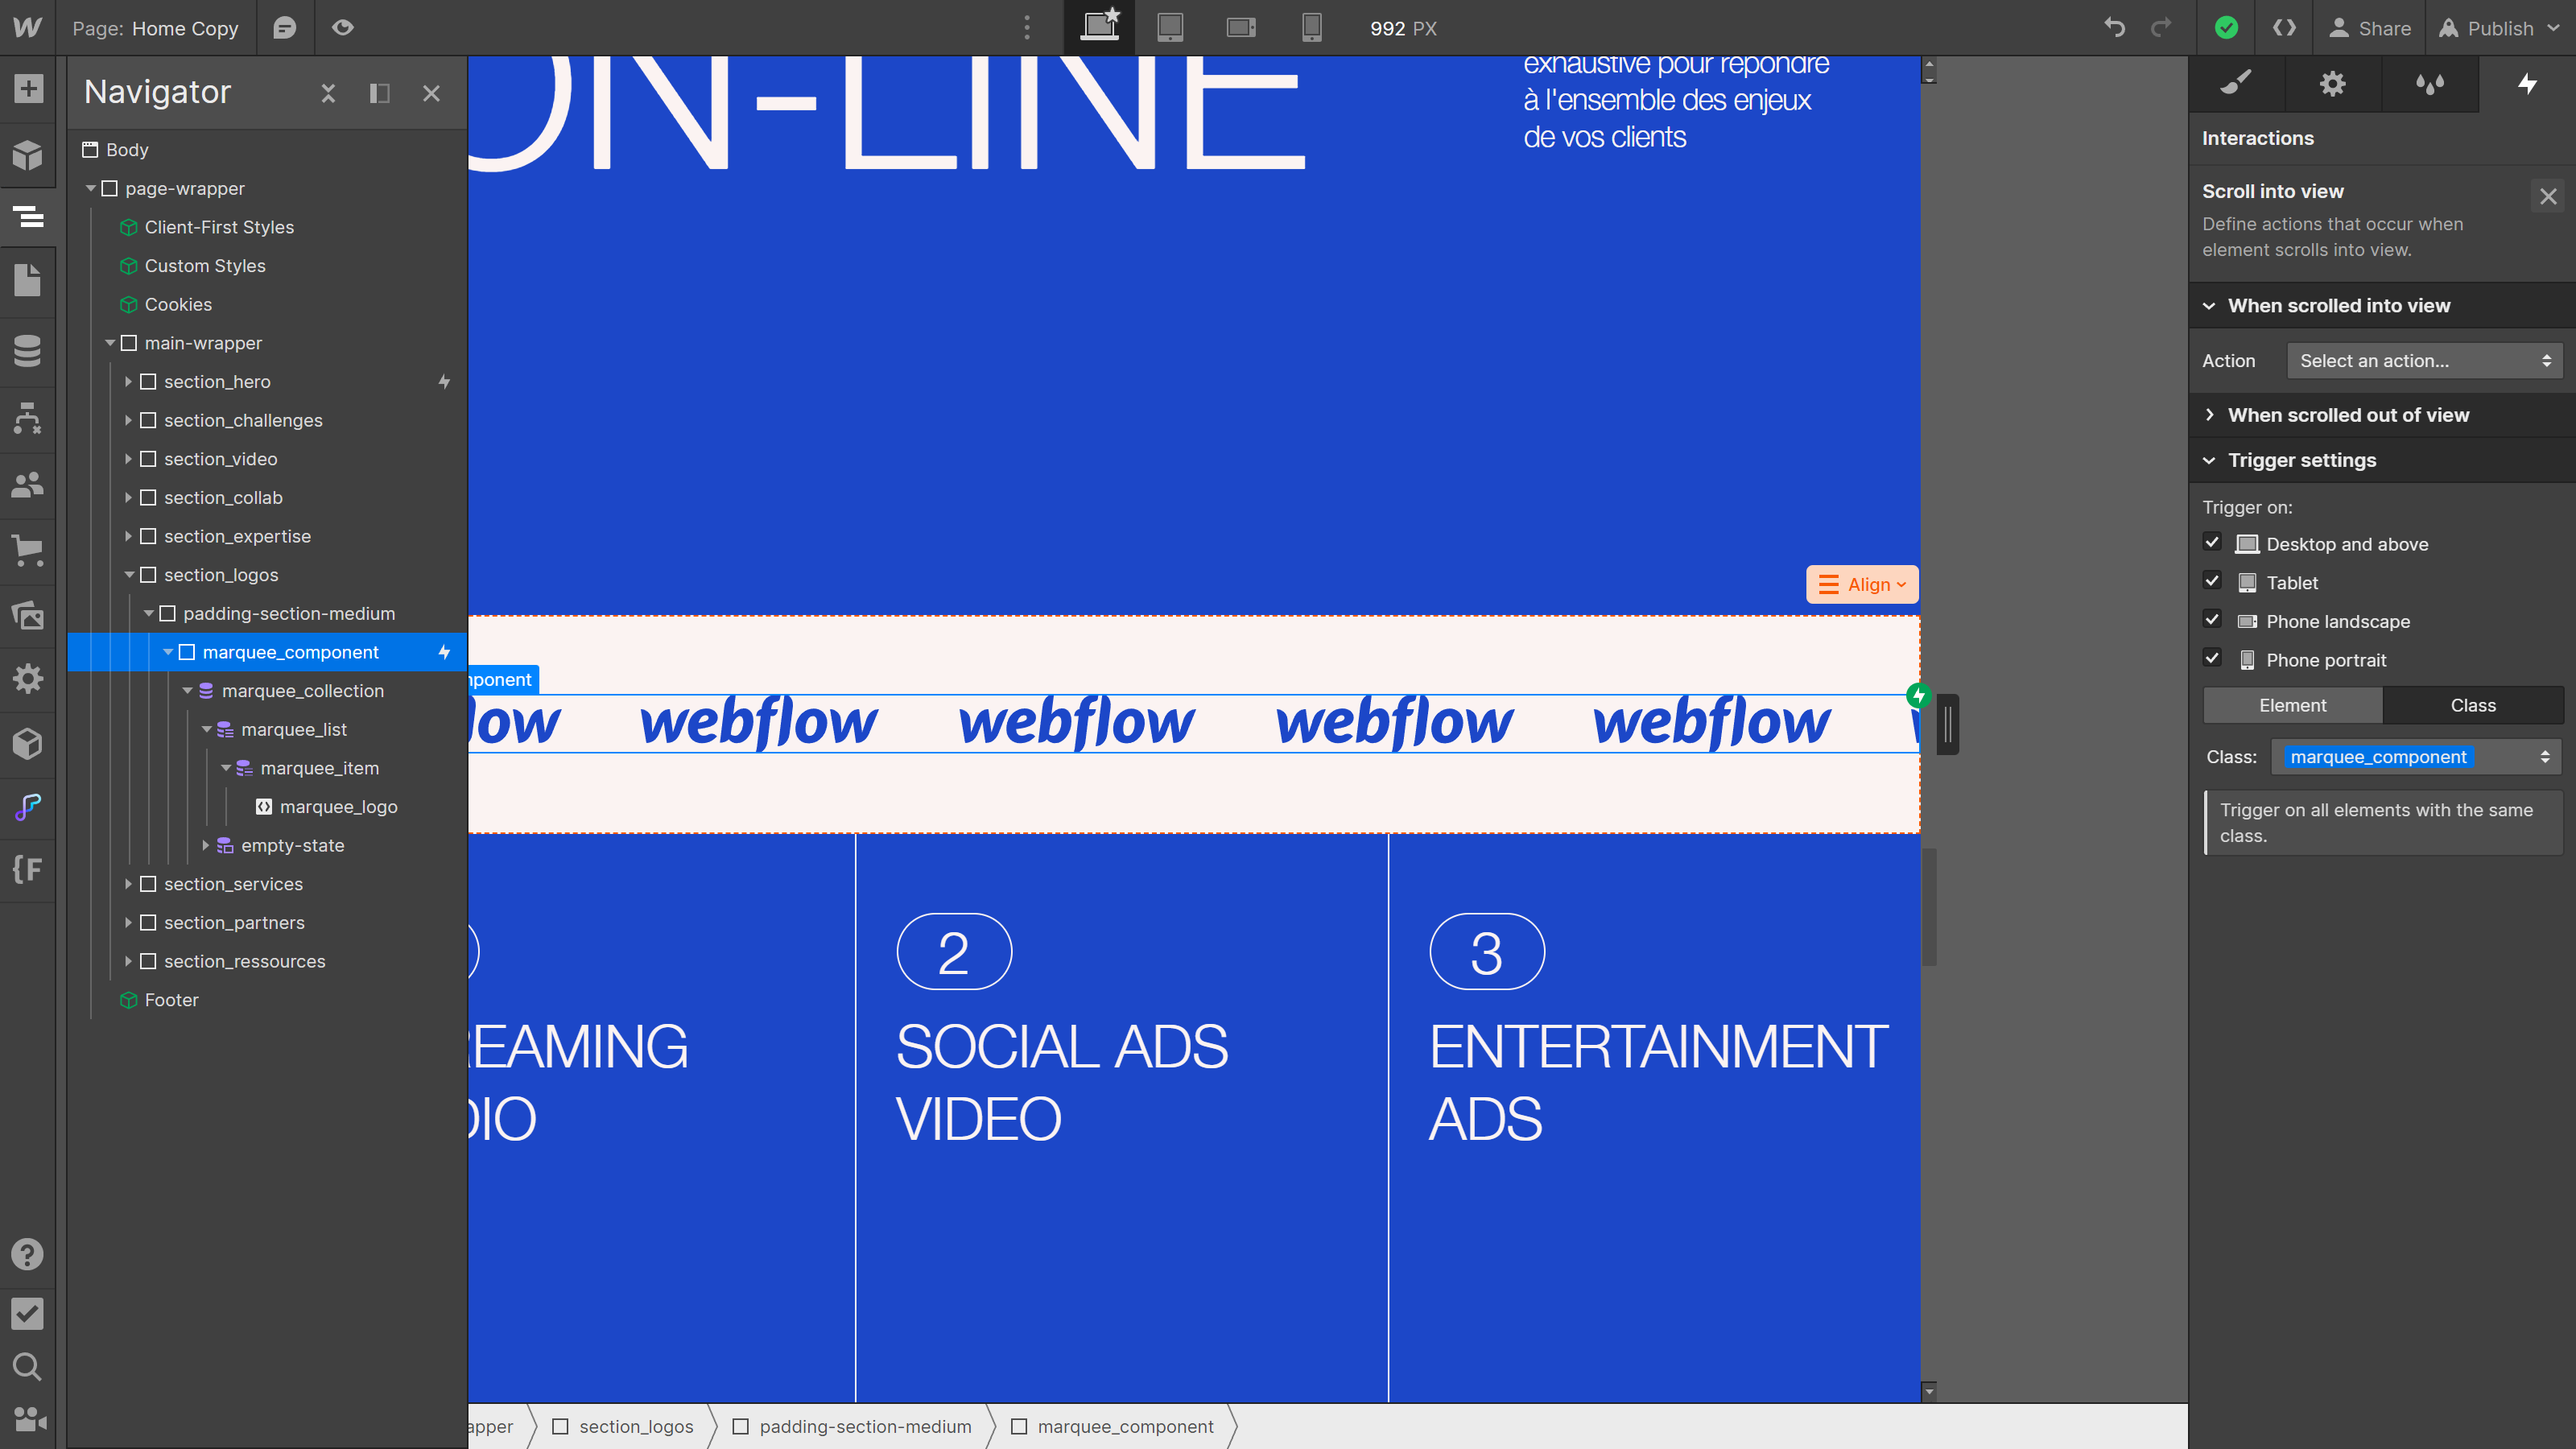
1. Create the interaction :
- Start by selecting the marquee_component element and creating an Element Trigger interaction.
- Select Scroll into view, set the Trigger Settings on the class so that the animation remains active when the component is copied, check the Loop option so that the animation repeats indefinitely and then create a When Scrolled Into View animation.
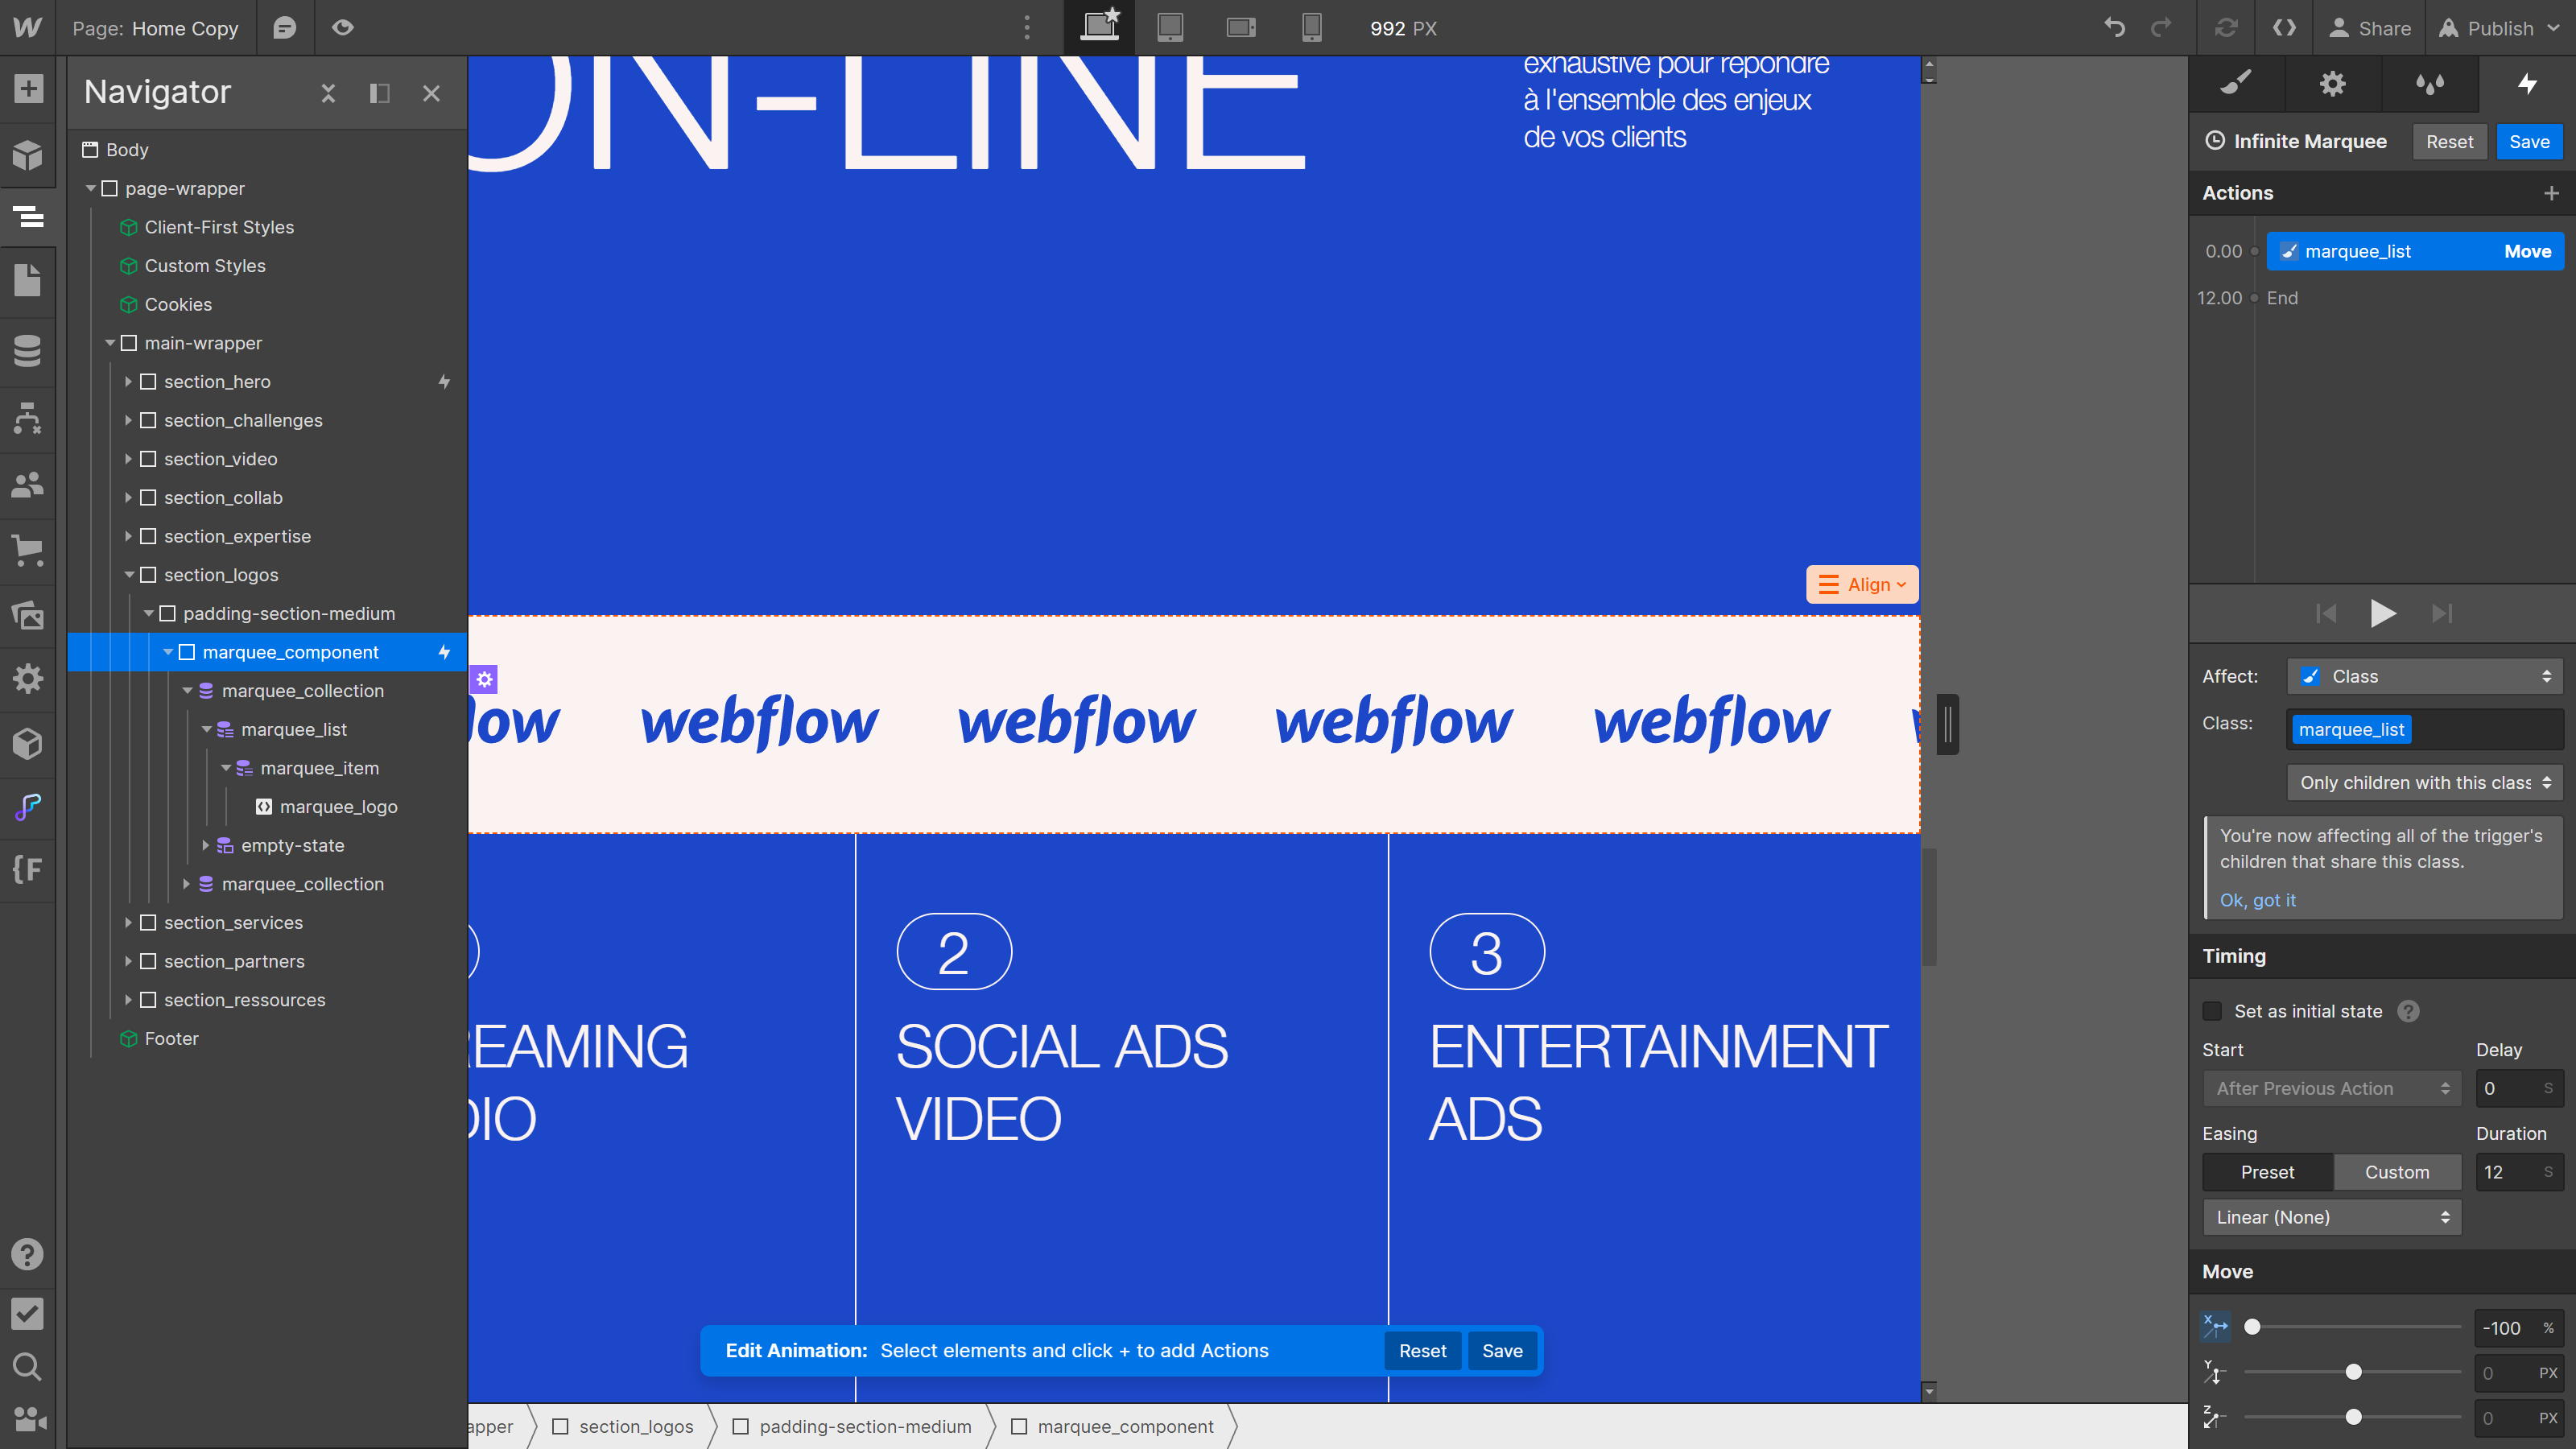
2. Set scrolling parameters:
- In the interaction actions, select your marquee_list element in the browser and add a Move animation for horizontal movement.
- Move the element horizontally to -100% and set a duration.
- In the action parameters, make sure that the element is targeted according to its class, so that the animation applies to all lists.
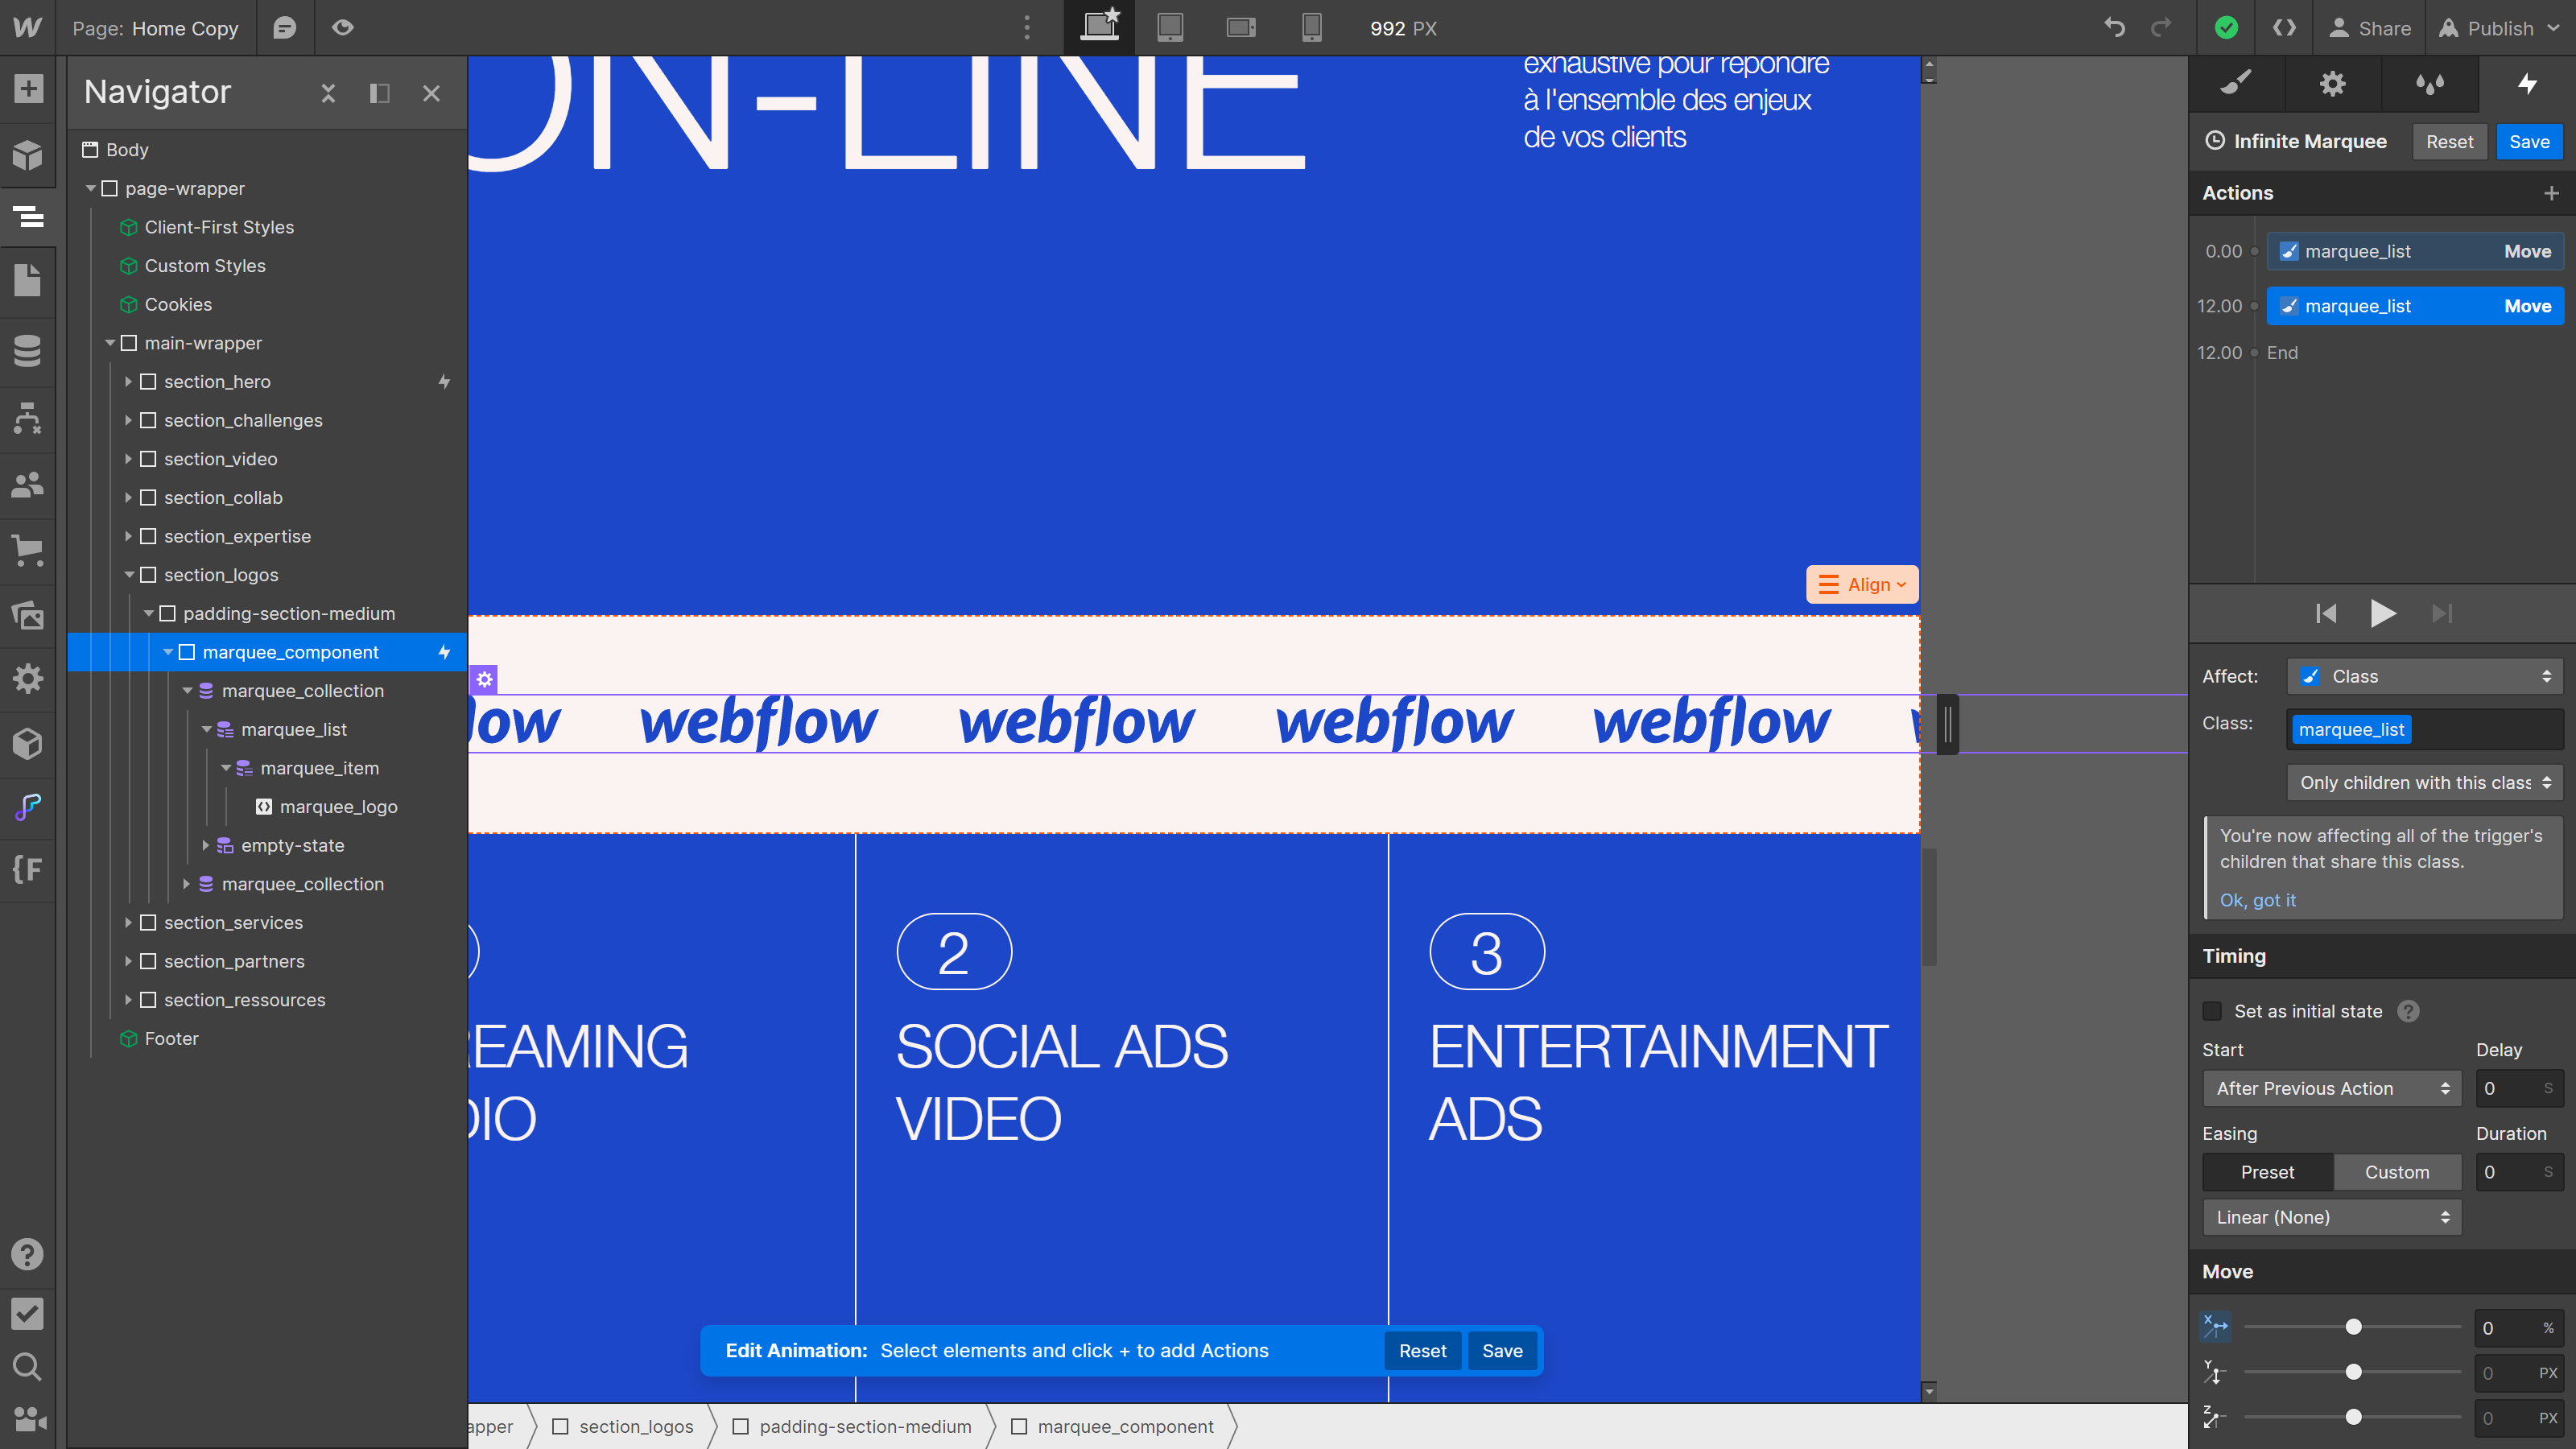
3. Close the animation:
- Then duplicate this first action to create the reset action.
- Move the element back horizontally to 0% and this time set the duration to 0 seconds, so that the return to the basic state is immediate.
Option 2: Custom CSS code
A second option is to opt for a CSS-based approach in custom code, which will have the advantage of being lighter:
1. Copy the following code into the custom code header:
If necessary, update the class name and adjust the duration.
2. Go to the custom code and paste it into the header.
3. Publish your project and admire the results.
Option 3: Splide JS
A third option for implementing infinite scrolling in Webflow is to use Splide JS, a lightweight JavaScript library for creating interactive sliders and scrollers.
This more complex option offers a scalability advantage if the CMS collection on which the animation is applied is to grow.
Unlike the first two options, which adjust speed according to list size (due to the specificity of CSS transform), Splide JS maintains a constant speed, regardless of component size (and thus, the number of elements inside). This option is therefore a good choice for customer projects that may need to evolve:
1. Create the structure required by Splide JS :
Splide JS requires a precise structure and naming of classes:

- Create a container with a splide class in which to add your collection.
- Give your Collection List Wrapper a splide__track class.
- Give your List Collection a splide__list class.
- Give your Item Collection a splide__slide class.
There's no need to duplicate the collection: Splide takes care of everything automatically.
If you want to manage several Splide JS components in your project, add a combo class to each of the required elements before applying specific styles to them. This will allow you to target and style each component specifically (as each has its own combo class).
2. Paste the following code into the header of your custom code:
3. Paste the following code into the footer of your custom code:
Modify the parameters if necessary, and remember to match the classes in the code with the classes actually present in your Webflow project.
Note that the gap between elements can be managed directly in Splide JS parameters, so it's not necessary in Webflow styles.
4. Publish and test :
Publish your project now and try out the infinite scrolling feature. You should see your logos scroll smoothly and dynamically in a loop.
The Splide JS approach offers a number of advantages, particularly for CMS collections, as scrolling automatically adjusts to the number of elements added by the client.
Summary of options
By choosing between these three options, you can create an infinite scrolling effect using the approach that suits you best:
- The more accessible interaction panel.
- Custom CSS code, lighter and more powerful.
- The more advanced Splide JS installation.
What do we think?
- For a simple, static project, a gain in performance is well worth a few lines of code.
- For more advanced customer projects that are likely to evolve over time, Splide JS may be a good option, albeit a more complex one.
In any case, this feature lets you add a touch of dynamism to your site by highlighting your logos.
Conclusion
In conclusion, adding an infinite scroll of logos to your Webflow site is a great way to enrich your visitors' experience by drawing their attention to key elements in a dynamic way.
In this article, we've explored three distinct approaches to achieving this effect, each with its own advantages depending on your specific needs:
- Using Webflow's native interactions offers an accessible solution, ideal for simpler projects where code manipulation is limited.
- Custom CSS code, meanwhile, offers a lightweight, high-performance option for controlling infinite scrolling, while retaining maximum optimization.
- For more advanced needs, Splide JS maintains a constant speed, regardless of the number of elements, making it a particularly scalable choice for projects with constantly evolving CMS collections.
Ultimately, the choice between these three options will depend on the complexity of your project, your coding skills and your performance preferences. Whether you opt for the simplicity of native interactions, the lightness of custom CSS or the flexibility of Splide JS, adding an infinite scroll of logos will inject a healthy dose of dynamism and visual appeal to your Webflow site, contributing to a memorable and engaging user experience.
To find out more, you can :
- read our article on : Comparing CSS and JavaScript to create Webflow animations
- read our article on : Slater, the ultimate tool for combining Webflow & Javascript
- see the Finsweet video on : Looping carousel of logos in Webflow using Splide JS
Ready to take your website to the next level?
Improve your online visibility thanks to Digidop's experience, excellence and reactivity!


.webp)
.webp)

