Introduction
For advanced and very specific projects, a customized calculator can be a great added value.
Imagine, for example, being able to quickly estimate the cost of a project, then dynamically display this estimate on a page according to the information entered by the user. Well, that's exactly what we're going to explore in today's article.
As the development of a calculator is necessarily specific to the needs and particularities of each project, this article will not follow a single model that you can copy and paste into your project.
Here, we'll break down the general logic of creating a calculator. Think of it as a guide, adaptable to the specific needs of your project.
Get ready to discover how, with a little Javascript code, you can add significant value to your Webflow projects. Let's get started!
Project description and variable definition
To begin with, before even diving into Webflow development, let's define the project and the parameters to be taken into account in our customized calculator.
Project Description:
- In this example, we're going to develop a simple budget calculator for the creation of a website.
- The calculator will appear on a "My Project" page, displaying an estimate based on the information entered by the user.
List of variables :
- Number of pages: To estimate the size of the site and the resources required to create it. The larger the site, the higher the budget.
- Level of difficulty (estimated as a percentage) : To estimate project complexity and workload. The more complex the site, the higher the budget.
- Design requirement: Binary choice to determine whether the project requires design. If yes, budget increases.
- Development requirement: Binary choice to determine whether the project requires development. If yes, budget increases.
This is the starting point of our custom calculator, and it's with these variables that we'll create our solution.
Detailed budget calculation
Then, one last thing before we move on to Webflow, let's take a closer look at how the budget estimate is calculated. For the sake of argument, let's imagine the following pricing system:
Basic pricing
Basic pricing is 500 euros per page, multiplied by a complexity index. This pricing is applicable if design OR development is required.
Basic pricing = (500 * number of pages) * (1 + difficulty percentage)
For example, for 5 pages and a complexity level of 25% :
Base pricing = (500 * 5) * (1 + 0.25) = 2500 * 1.25 = €3,125
Advanced pricing
Advanced pricing corresponds to basic pricing multiplied by 1.75. This pricing is applicable if design AND development are required.
Advanced pricing = base pricing * 1.75
For example, for the same 5 pages and a complexity level of 25% :
Advanced pricing = 3125 * 1.75 = 5468.75€.
Note that the variables and calculations are specific to this example, and could be adjusted according to the project's specific requirements. This is the fictitious pricing that we're going to concretize with the calculator, but we can imagine any calculation system depending on the characteristics of your project, whether it's more advanced or not.
Now that we know the details of the configuration, let's go to Webflow to set up the calculator structure (HTML+CSS).
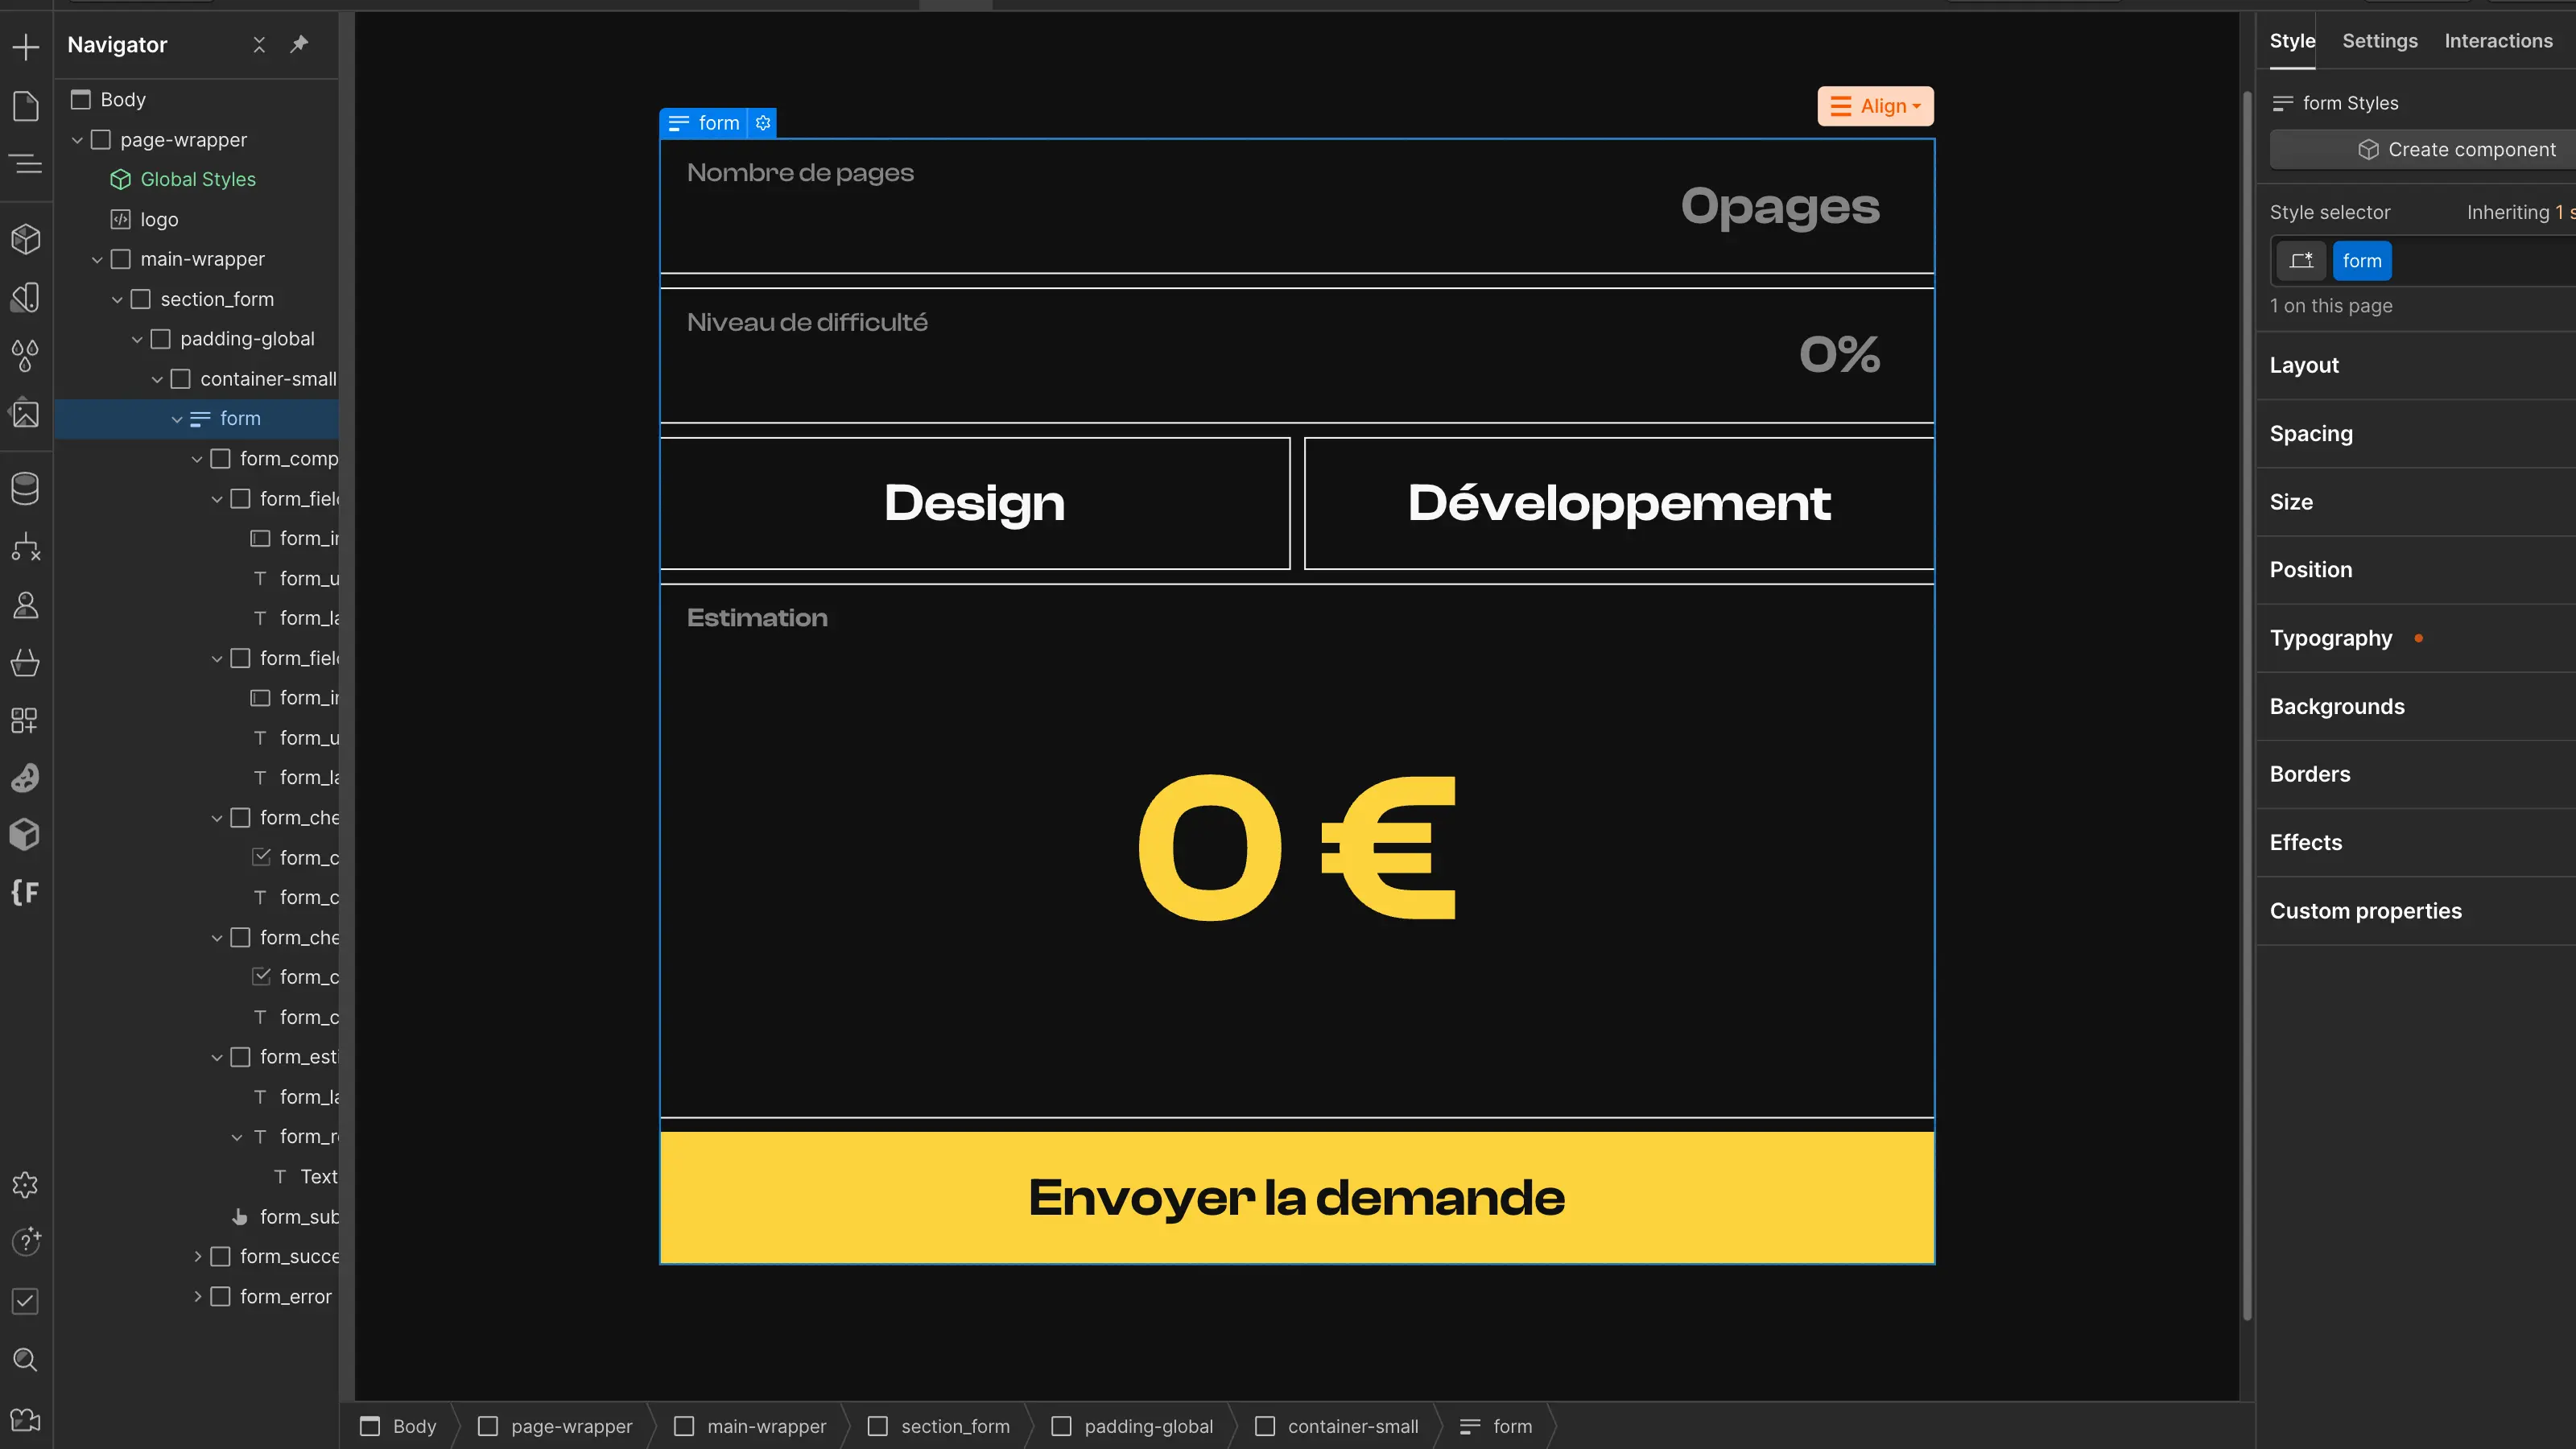
Creating the calculator structure in Webflow
Now that we've switched over to Webflow, the next step in making our calculator work is to set up the whole structure: create the form and the necessary inputs, then make these inputs easy to target in the custom code (discussed later). These user-modifiable inputs will be the key to estimating the budget.
What is needed to operate the calculator:
- a form to add our fields ;
- a number field for the number of pages,
- a number field for the level of complexity,
- a checkbox for whether or not design is required,
- a checkbox for the need to develop or not,
- a text field to dynamically display the result of the estimate.
Once the various fields have been created, all that remains is to assign an ID to each one. This will enable us to identify them in the code and retrieve their value.
We therefore add :
- a "pagesInput" ID to the field for the number of pages,
- a "difficultyInput" ID to the field for the number of pages,
- a "designCheckbox" ID to the checkbox for the design requirement,
- a "developmentCheckbox" ID to the checkbox for the design requirement,
- a "priceElement" ID for the text element in which to display the result.
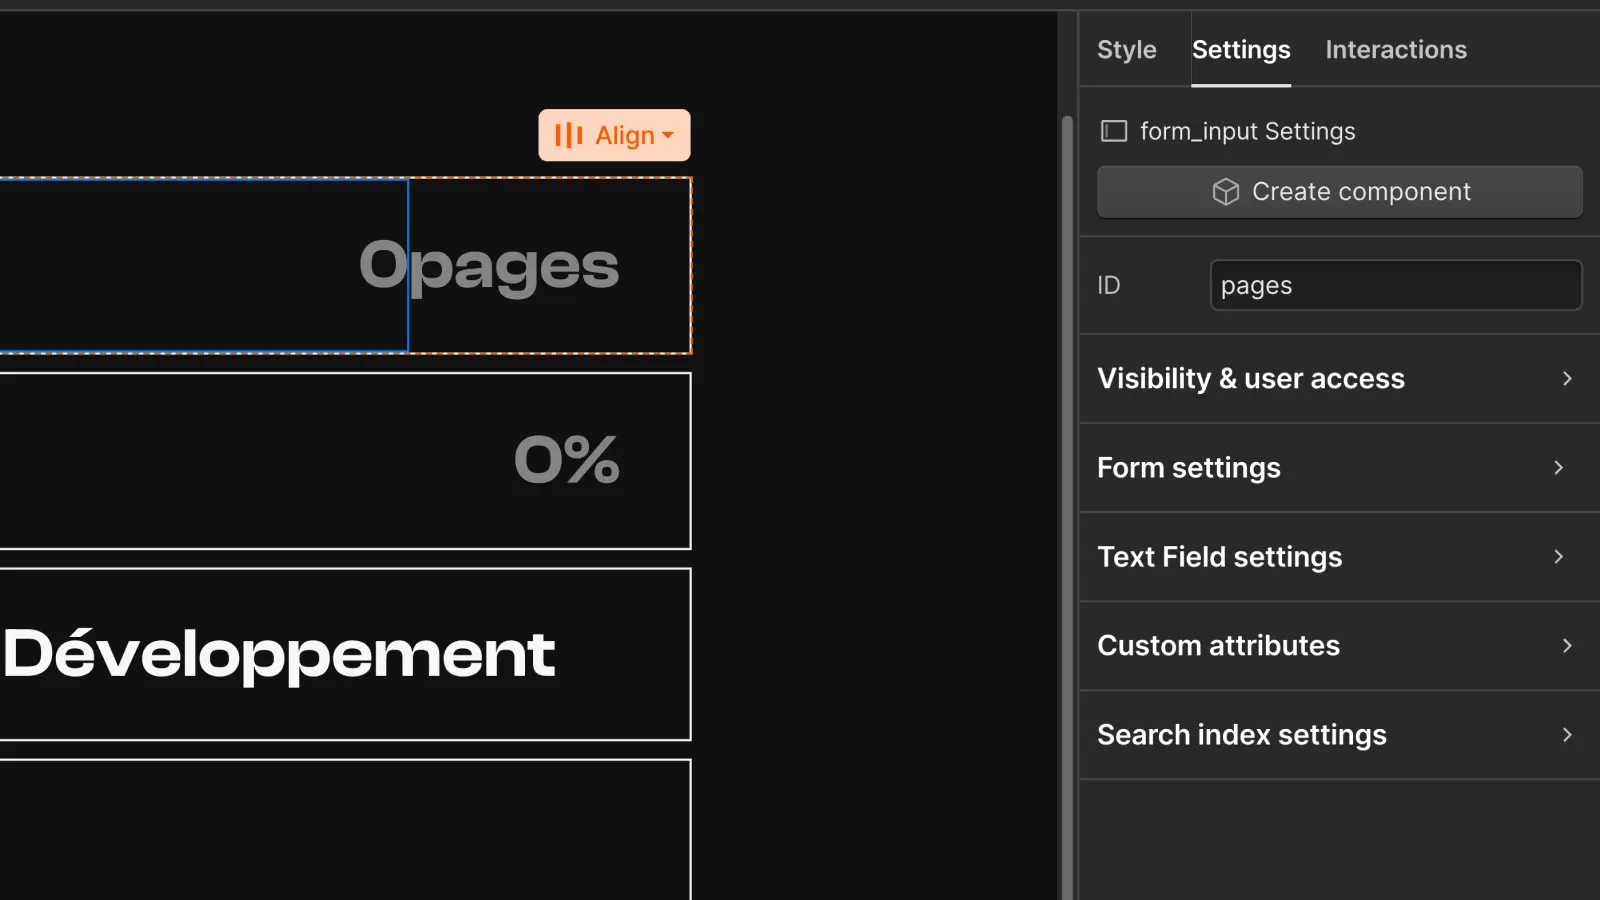
This step is essential to establish a connection between the form elements and our JavaScript code. Be sure to name your IDs consistently to make the code easier to understand.
Following these first steps, we're now ready to move on to the next phase: writing the Javascript code that will bring our calculator to life.
Javascript custom code
Now that we've created our form with the necessary fields in Webflow, let's move on to the Javascript custom code. Don't worry if you're not an expert, we'll decipher it step by step.
The different steps to check with the code :
- Retrieve values from form inputs.
- Perform calculations based on these values.
- Dynamically update result display each time fields are modified.
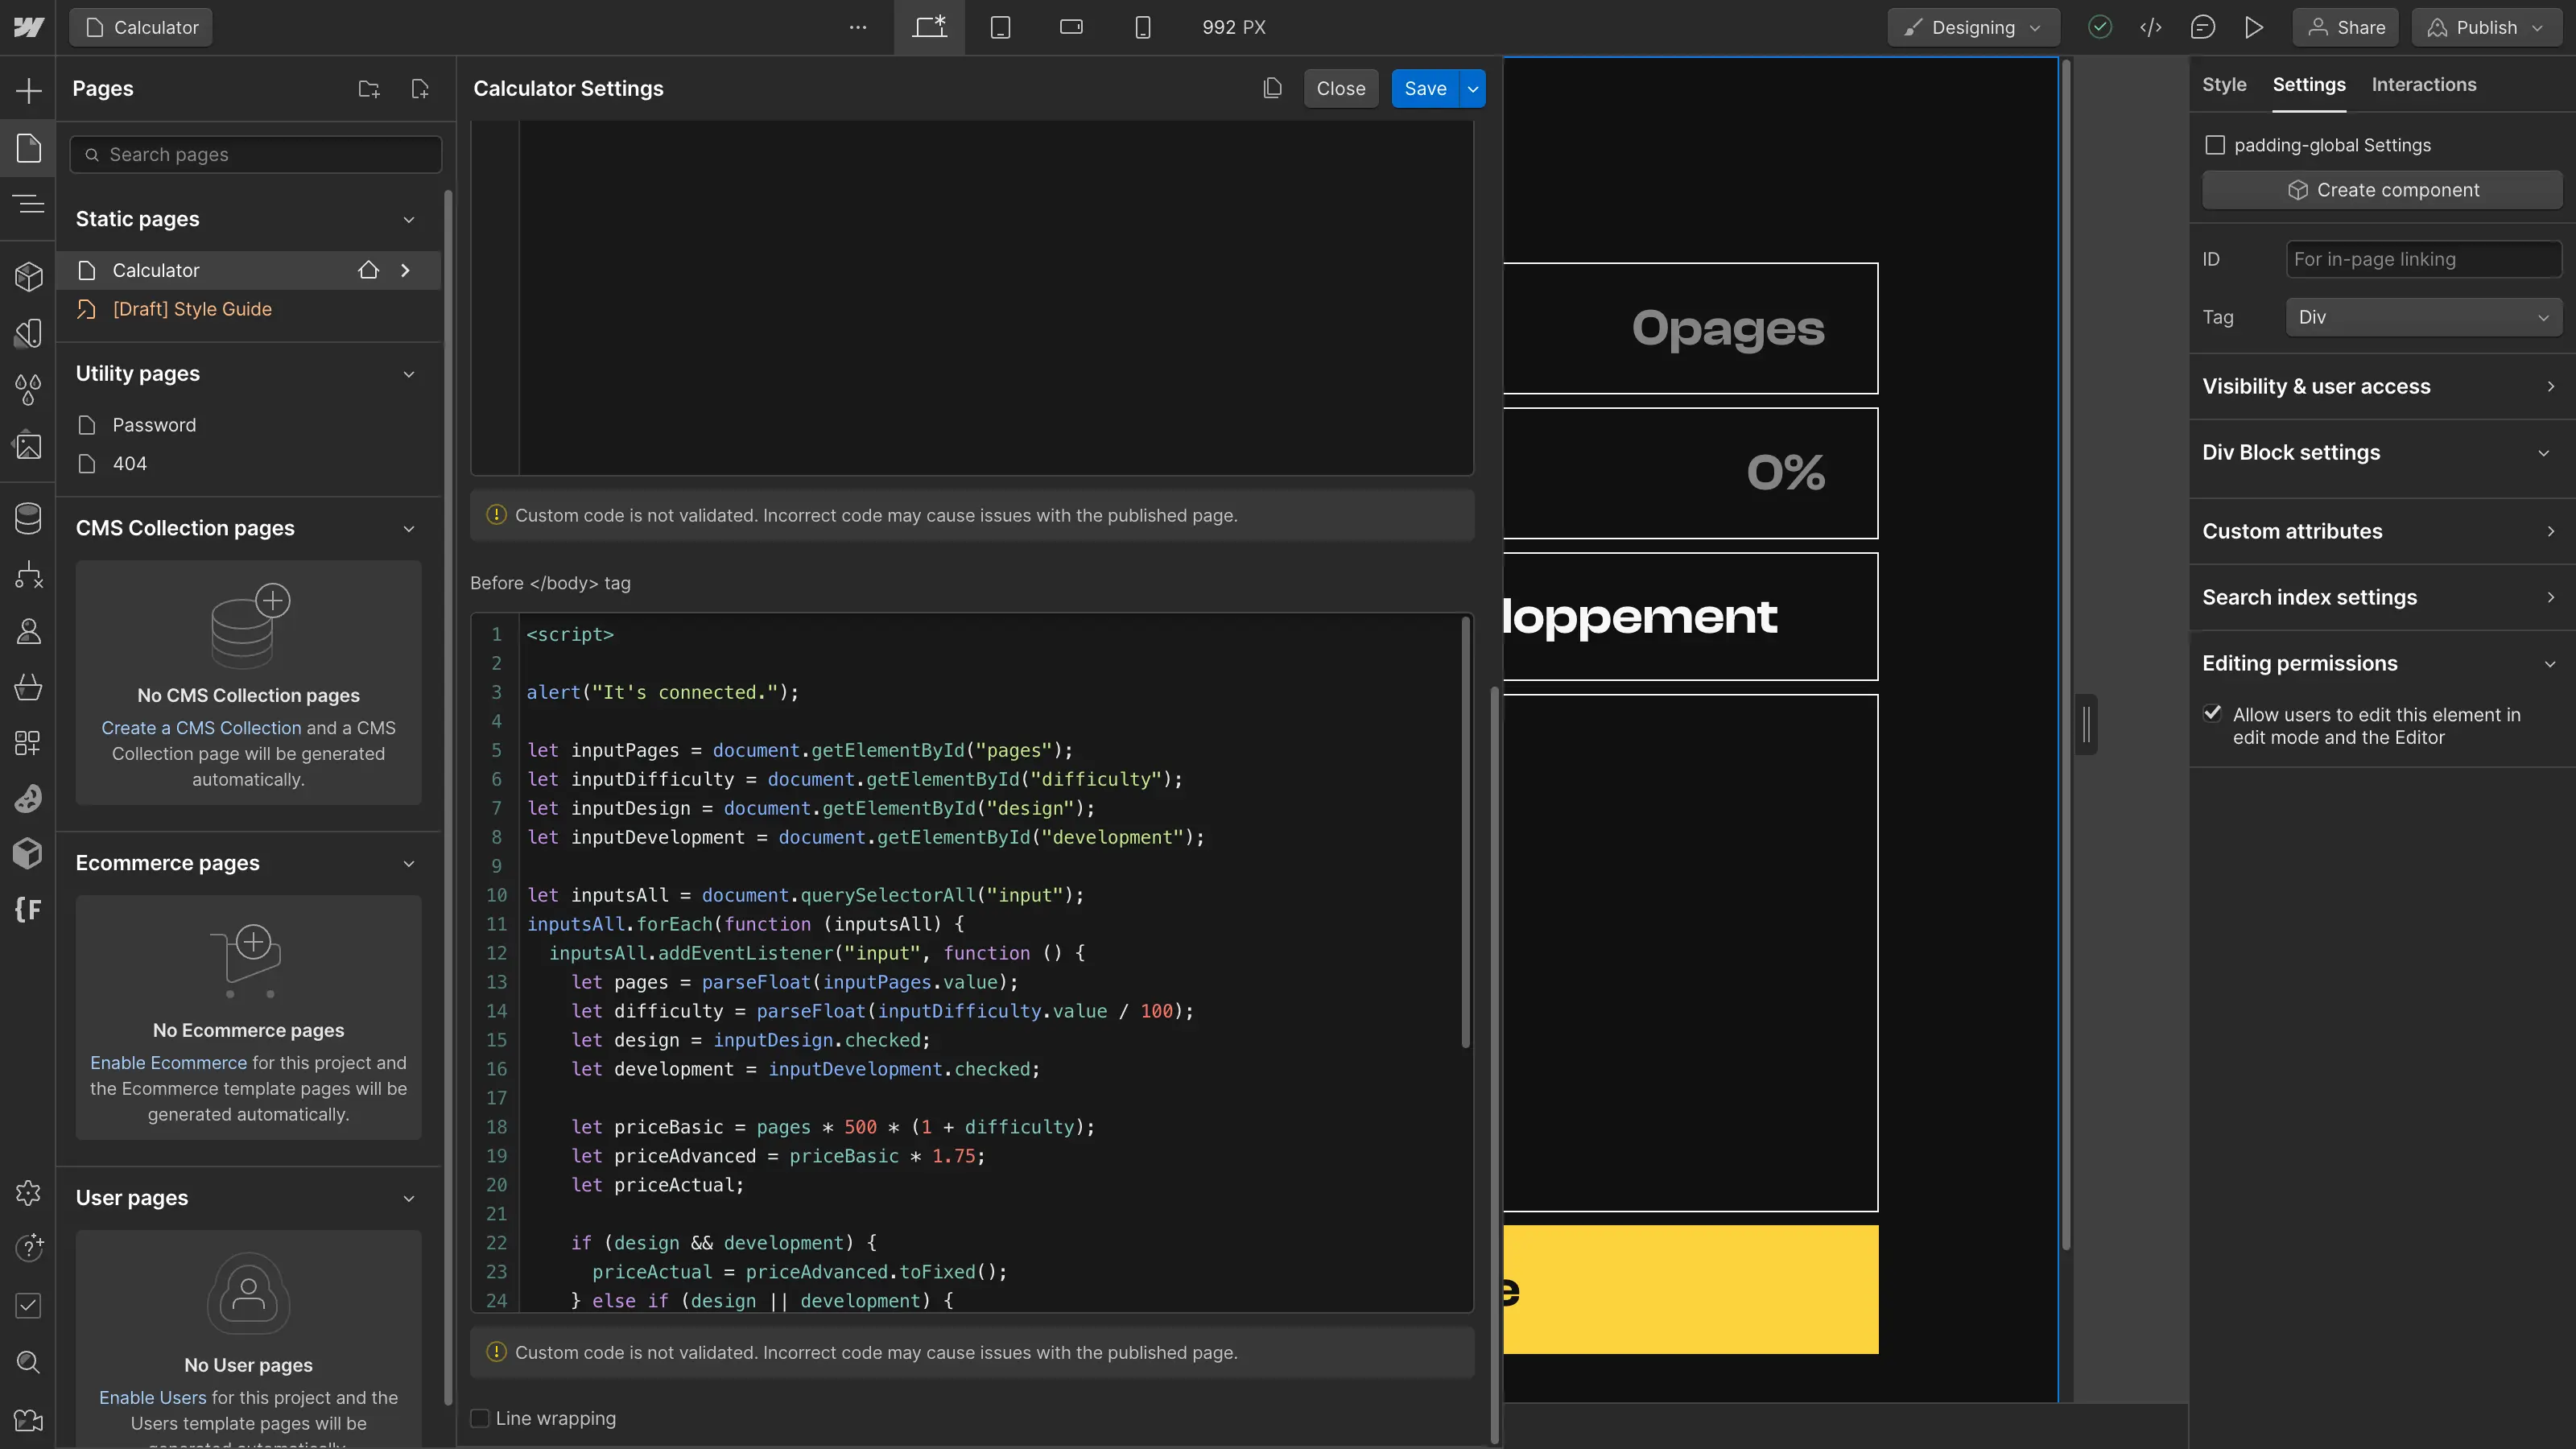
#1 Retrieve form elements
To start with, we can retrieve the form's elements from our code and store them in variables for later reuse.
In Javascript, we can do this with the getElementById method to retrieve specific elements based on their ID (which we defined earlier).
let pagesInput: creates a variable to associate with something (in this case, one of our form fields).
document.getElementById("pages"): retrieves the HTML element with the corresponding ID.
#2 Listen to field modifications
Next, we'll identify all the form fields in a variable, create a loop that will go through these fields and add an event listener to each of them.
In simple terms, when the user modifies the value of any form field, the code inside this event listener will be executed.
querySelectorAll("input") : récupère tous les éléments correspondant au sélecteur CSS entre parenthèses. (ici, tous les éléments avec une balise <input>)
inputsAll.forEach(function ()): scans all the elements stored in our inputsAll variable and executes the code provided for each of them.
addEventListener("input", function()) : listens for input events on each element, i.e. field modifications, and executes the code provided when the event occurs.
Thanks to these few lines, the code we add to the event listener will be executed each time the event in question occurs. Each time one of the form fields is modified, we'll be able to perform our calculations and dynamically modify the result of our estimate.
#3 Extract field values
Inside our event listener, we can now begin our calculations.
To begin with, we're going to create new variables to extract the values entered by the user in our form fields and change them into numbers (so that we can then perform our calculations).
pagesInput.value: retrieves the value entered in the corresponding field.
parseFloat() : changes the initial string value into a number for subsequent calculations.
designCheckbox.checked: retrieves the status of the corresponding checkbox (the variable will return true if the checkbox is checked, and false if it is not).
#4 Budget calculation
Now that our values are stored in variables, we can move on to the calculations.
To begin with, we create new variables for the base price, the advanced price and the price that will actually be taken into account, then perform one calculation or another according to the choices made by the user:
- If design AND development are required, the advanced price calculation will be taken into account.
- If one OR the other is required, the base price calculation will be taken into account.
- If neither is required, the price will be zero.
if (condition) {} : exécute la fonction fournie si la condition est rencontrée.
else if (condition) {} : exécute la fonction fournie si la condition est rencontrée, dans la cas où la condition précédente ne l’est pas.
else {} : exécute la fonction fournie si les précédentes conditions ne sont pas rencontrées.
toFixed(): rounds a number to the nearest integer.
#5 Display result dynamically
Finally, you can update the result display.
priceSpan.innerText: modifies the textual content of the element.
In short, this JavaScript script listens for changes to form fields, retrieves the values of these fields, performs a calculation with the retrieved values according to the specified conditions, then updates the display of the result on the page.
The complete code :
And with all that, our personalized calculator is now up and running!
Now that the code is ready, all that's left to do is add it to the Footer Code of Webflow's custom code.
Conclusion
As mentioned earlier, this is not a code to be copied and pasted into your project. Developing a calculator is a project-specific solution.
However, the general logic behind the creation of our calculator and the different methods used can be replicated in many situations. So take this article as a guide that you can follow and adapt to the specific needs you encounter.
Creating calculators may seem difficult, but with a good understanding of the necessary steps, you can add significant value to your projects.
We invite you to experiment with your own solutions, look for additional Javascript functionalities and get trained on the subject!
To find out more about Javascript, take a look at the following resources:
Ready to take your website to the next level?
Improve your online visibility thanks to Digidop's experience, excellence and reactivity!


.webp)
.webp)

