Would you like to know how to send data from a Webflow form to a specific e-mail address?
With Logic, Webflow's native automation tool, you can easily automate this process. Although development of Logic has been halted by Webflow, it is now available in open beta.
In this article, we'll guide you through the steps involved in sending your Webflow form data to a specific e-mail address. Follow these simple instructions to optimize your workflow and receive form information directly to your inbox.
Step 1: Create your form in Webflow
To get started, you can easily create your form in the Webflow designer. Thanks to the tool's native elements, you can customize your form as you see fit to collect specific data. You can also customize the form design without limit.
Don't forget to add the fields required to collect the relevant information from your users.

Step 2: Add the e-mail address as a Webflow project editor
To enable thespecific e-mail address to receive form notifications, you need to add it as aWebflow project editor.
Log in to your Webflow account, access the project settings and add the e-mail address in the authorized editors section(Members > Site Access or Content Editors).
Depending on your Webflow plan, you can add 3 or 10 editors.

Step 3: Create a new "Flow" in the "Logic" area of the Webflow Designer
Logic has been available to all webflowers for a few days now. You can find it in the designer below the CMS icon (or with the keyboard shortcut "L").
So once you've finished creating your form, go to the"Logic" area in the Webflow Designer.
Click on"New Flow" to start configuring the automation.

To avoid getting lost, we recommend that you add a precise name and description to this "flow".

Step 4: Choose a "Form Submission" trigger
Once inside your automation (your "flow"), you'll be able to select a"trigger". A trigger is an action or element that triggers your automation.
In our case, we'll select a"Form Submission" trigger in Logic. This trigger will activate the automation flow each time a user submits the form.

We can now choose which form on our website we'd like to automate. On the right-hand side, we can select the precise form in the"Form" selection field.

You can also give the action a name in"Trigger Name" for greater clarity.
Step 5: Add a "Send Email Notification" action
In the automation sequence, we'll add a new block (blocks are located on the left-hand side of your "flow".
We'lldrag and drop the"Send Email Notification" action below our trigger.

Once this has been done, we'll be able to personalize the e-mail that will be sent to the specific e-mail address on the right. In"Settings", we can choose who to send it to in the "send to" selection field (in the selection, we have all the members who have access to the project).

In"subject" and"message", we'll be able to modify the subject of e-mails and their content respectively. You can insert information filled in by users into your form by clicking on the purple dot (insert a variable).

If some of your fields are not mandatory, you'll need to add a "fallback text" if the field has not been filled in. You'll notice them by the orange icon with a tool inside, in the text of your e-mail subject or message.

Step 6: Publish the "Flow" and publish the project
Once you've set up the automation flow, make sure you publish it. This will activate the process of sending the form data to the specific e-mail address.
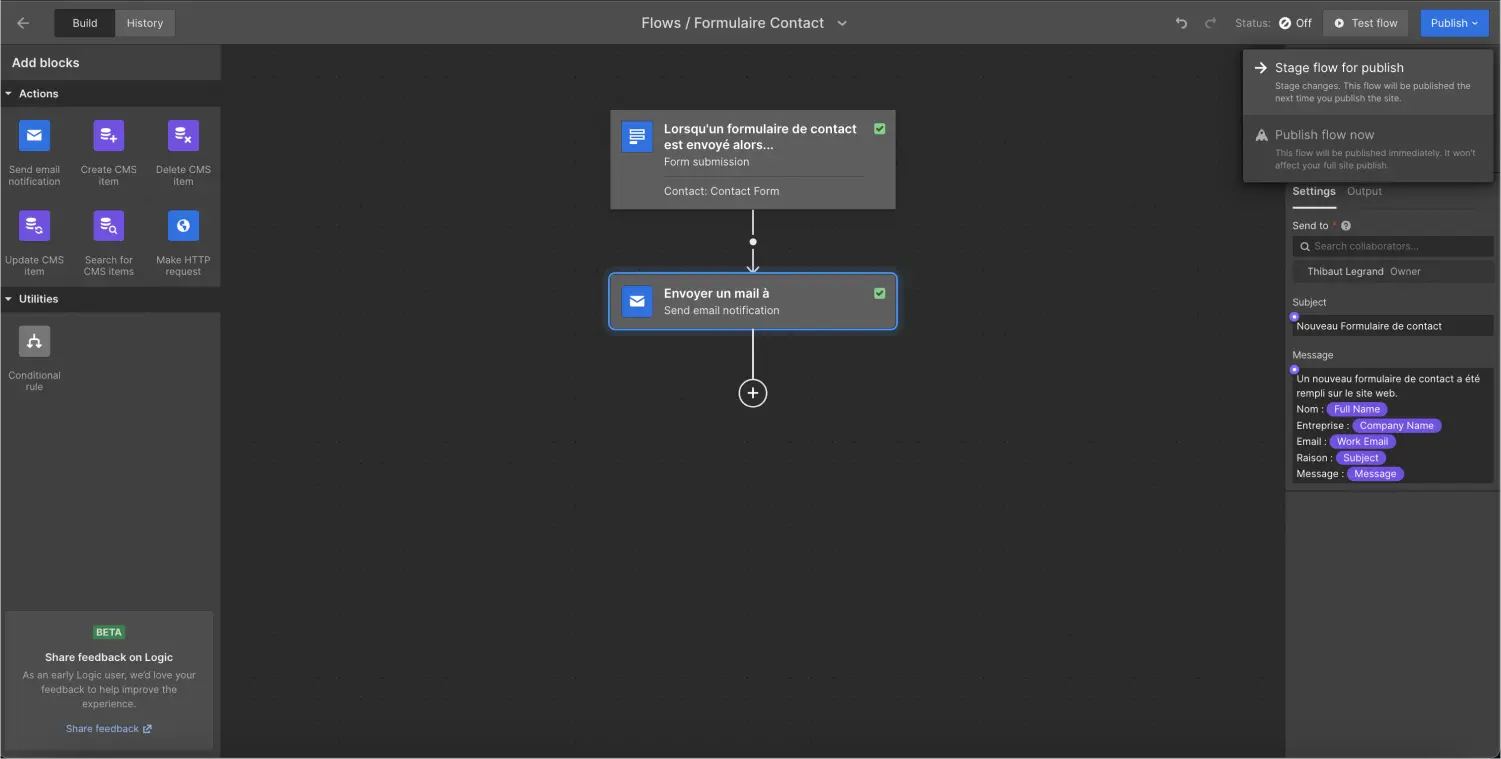
Then publish your Webflow project to make your form and automation flow available online.
Thanks to Logic, Webflow's native automation tool, you can easily send data from a Webflow form to a specific e-mail address. By following the steps described in this article, you'll be able to quickly configure this feature. Even if you can't send form data to an e-mail address that isn't part of your project, it's still an interesting feature.
Of course, you can go much further in customizing your automation by adding conditions, for example! Let your imagination help you create even more powerful sites with Webflow.
To take things a step further, find out how to integrate and fully customize a hubspot form in webflow.
Ready to take your website to the next level?
Improve your online visibility thanks to Digidop's experience, excellence and reactivity!


.webp)
.webp)

