The security of a website is a major issue today. There are different methods to secure your website, and to complete them Webflow proposes to add an access code to your website. The objective is to restrict access to data on your site or a specific page to targeted people. For example, you might need to showcase customer prototypes, share members-only content, internal data, etc.
Add a password to a Webflow page
Whether in the designer mode or in the editor mode of your Webflow site, you can add an individual password to each page. Each page of the site will thus have a unique identifier that will allow you to protect their content.
1. Protect a page from the designer mode
Log into your Webflow project, then open the page bar on the left. Choose a page and click directly on the page settings. In the first section "General" you have a space "Password protection" which by default is in off mode. Click on the button and add your own password.
2. Protecting a page from the editor mode
From the Webflow editor mode you can easily add a password to a page by going to the Pages > Settings tab. Click on the "Password protection" button to define and activate your password.

Add a password to a set of Webflow pages
In Webflow you have the possibility to create sets of pages, composing a folder. Access to this folder can be restricted by a unique password, which will protect all the pages it contains. Each folder in your project can of course have a unique password.
In Webflow we work a lot with the notion of parent and child elements, to illustrate the dependency that exists between these elements. A modification on a parent element will directly impact the child elements which will adopt the same behaviour. Here, folders are considered as "Parents" of "Children" pages. A password on a folder will therefore apply to all the pages it contains.
1. Protect a page from the designer mode
To activate the protection of a folder, proceed in the same way as for simple pages. Go to your Webflow project, select in the "Pages" tab the folder you are interested in. In the "General" section you will be able to activate the "Password protection" and personalise your password. This will be the same for all the pages in the folder.

2. Protecting a page from the editor mode
Connect in editor mode to your Webflow site. In the "Pages" tab, select the set of pages or the file you want to protect. Go to the file settings by clicking on "Settings". You will now be able to activate the "Password protection" and add a custom password.

Add a password to your Webflow collections
Webflow allows you if you wish to protect each dynamic page of your collections. Thus, each person who will wish to go on a page of your collection will have to enter a password. To add a password to a collection, it works the same way as adding a password to a classic page. By adding a password to any dynamic page, it will apply to all pages in that section.
1. Protect a collection from the designer mode
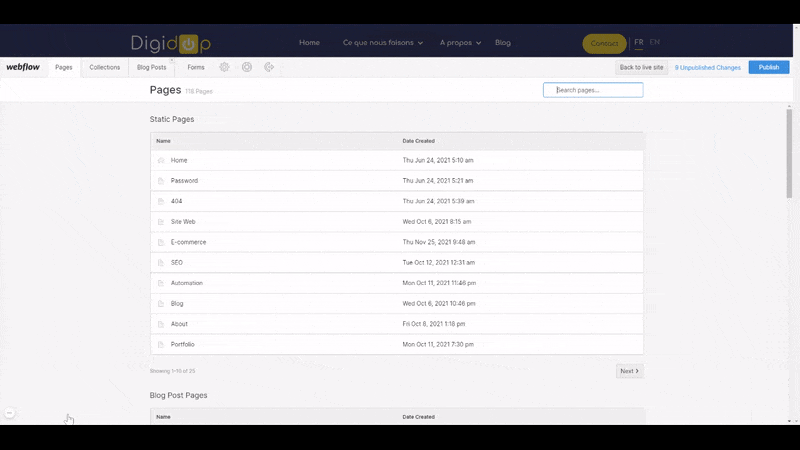
From the Webflow designer mode go to your "pages". Go to the "CMS Collection pages" section. Select the collection you want to protect and open the settings. In the first section "General" activate the "Password protection" and enter your password.
2. Protecting a collection from the editor mode
When you are connected in editor mode on your Webflow site, go to your "Pages". Scroll down to your dynamic pages. Stop on the collection you are interested in. Choose any page of this collection and open the settings by clicking on "Setting". Activate the "Password protection" and enter your password.
Add a password to your entire Webflow site
The final step in protecting your website is to limit access to all its data and add a password to the whole site. This can be useful, for example, when you are celebrating tests or demonstrations.
💡 Editing a site-wide password will remove any passwords you have previously set on other pages, files or collections.
1. Add a password to your Webflow site in designer mode
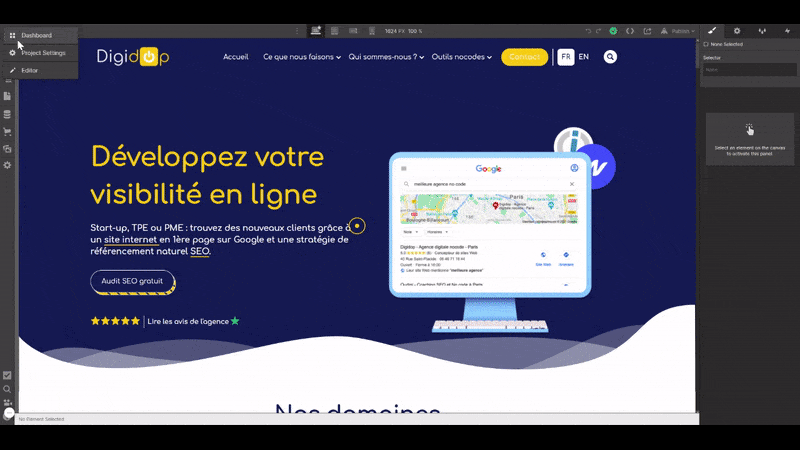
From the designer mode, go to the general site settings by clicking on "Project Settings" at the top left of your screen. From the "General" tab, scroll down to the "Website Password" section. Enable "Password Protection" and add the password to your site.
2. Add a password to your Webflow site in editor mode
Adding a password to the whole site is not accessible from the editor mode. Contact your webmaster or connect directly to the designer mode of your Webflow site.
⚠️ Whenever you add a password to a page, folder or your site, remember to publish the site to activate the password.
Ready to take your website to the next level?
Improve your online visibility thanks to Digidop's experience, excellence and reactivity!


.webp)
.webp)

